The WP Crowdfunding settings page allows you to configure various options and customize your crowdfunding platform according to your needs. From setting the currency to managing email templates and campaign visibility, this page provides you with the flexibility to personalize your crowdfunding experience. Explore the settings and make adjustments to create a seamless and efficient crowdfunding environment.
You can access the settings page from WP Dashboard > Crowdfunding > Settings.
General Settings
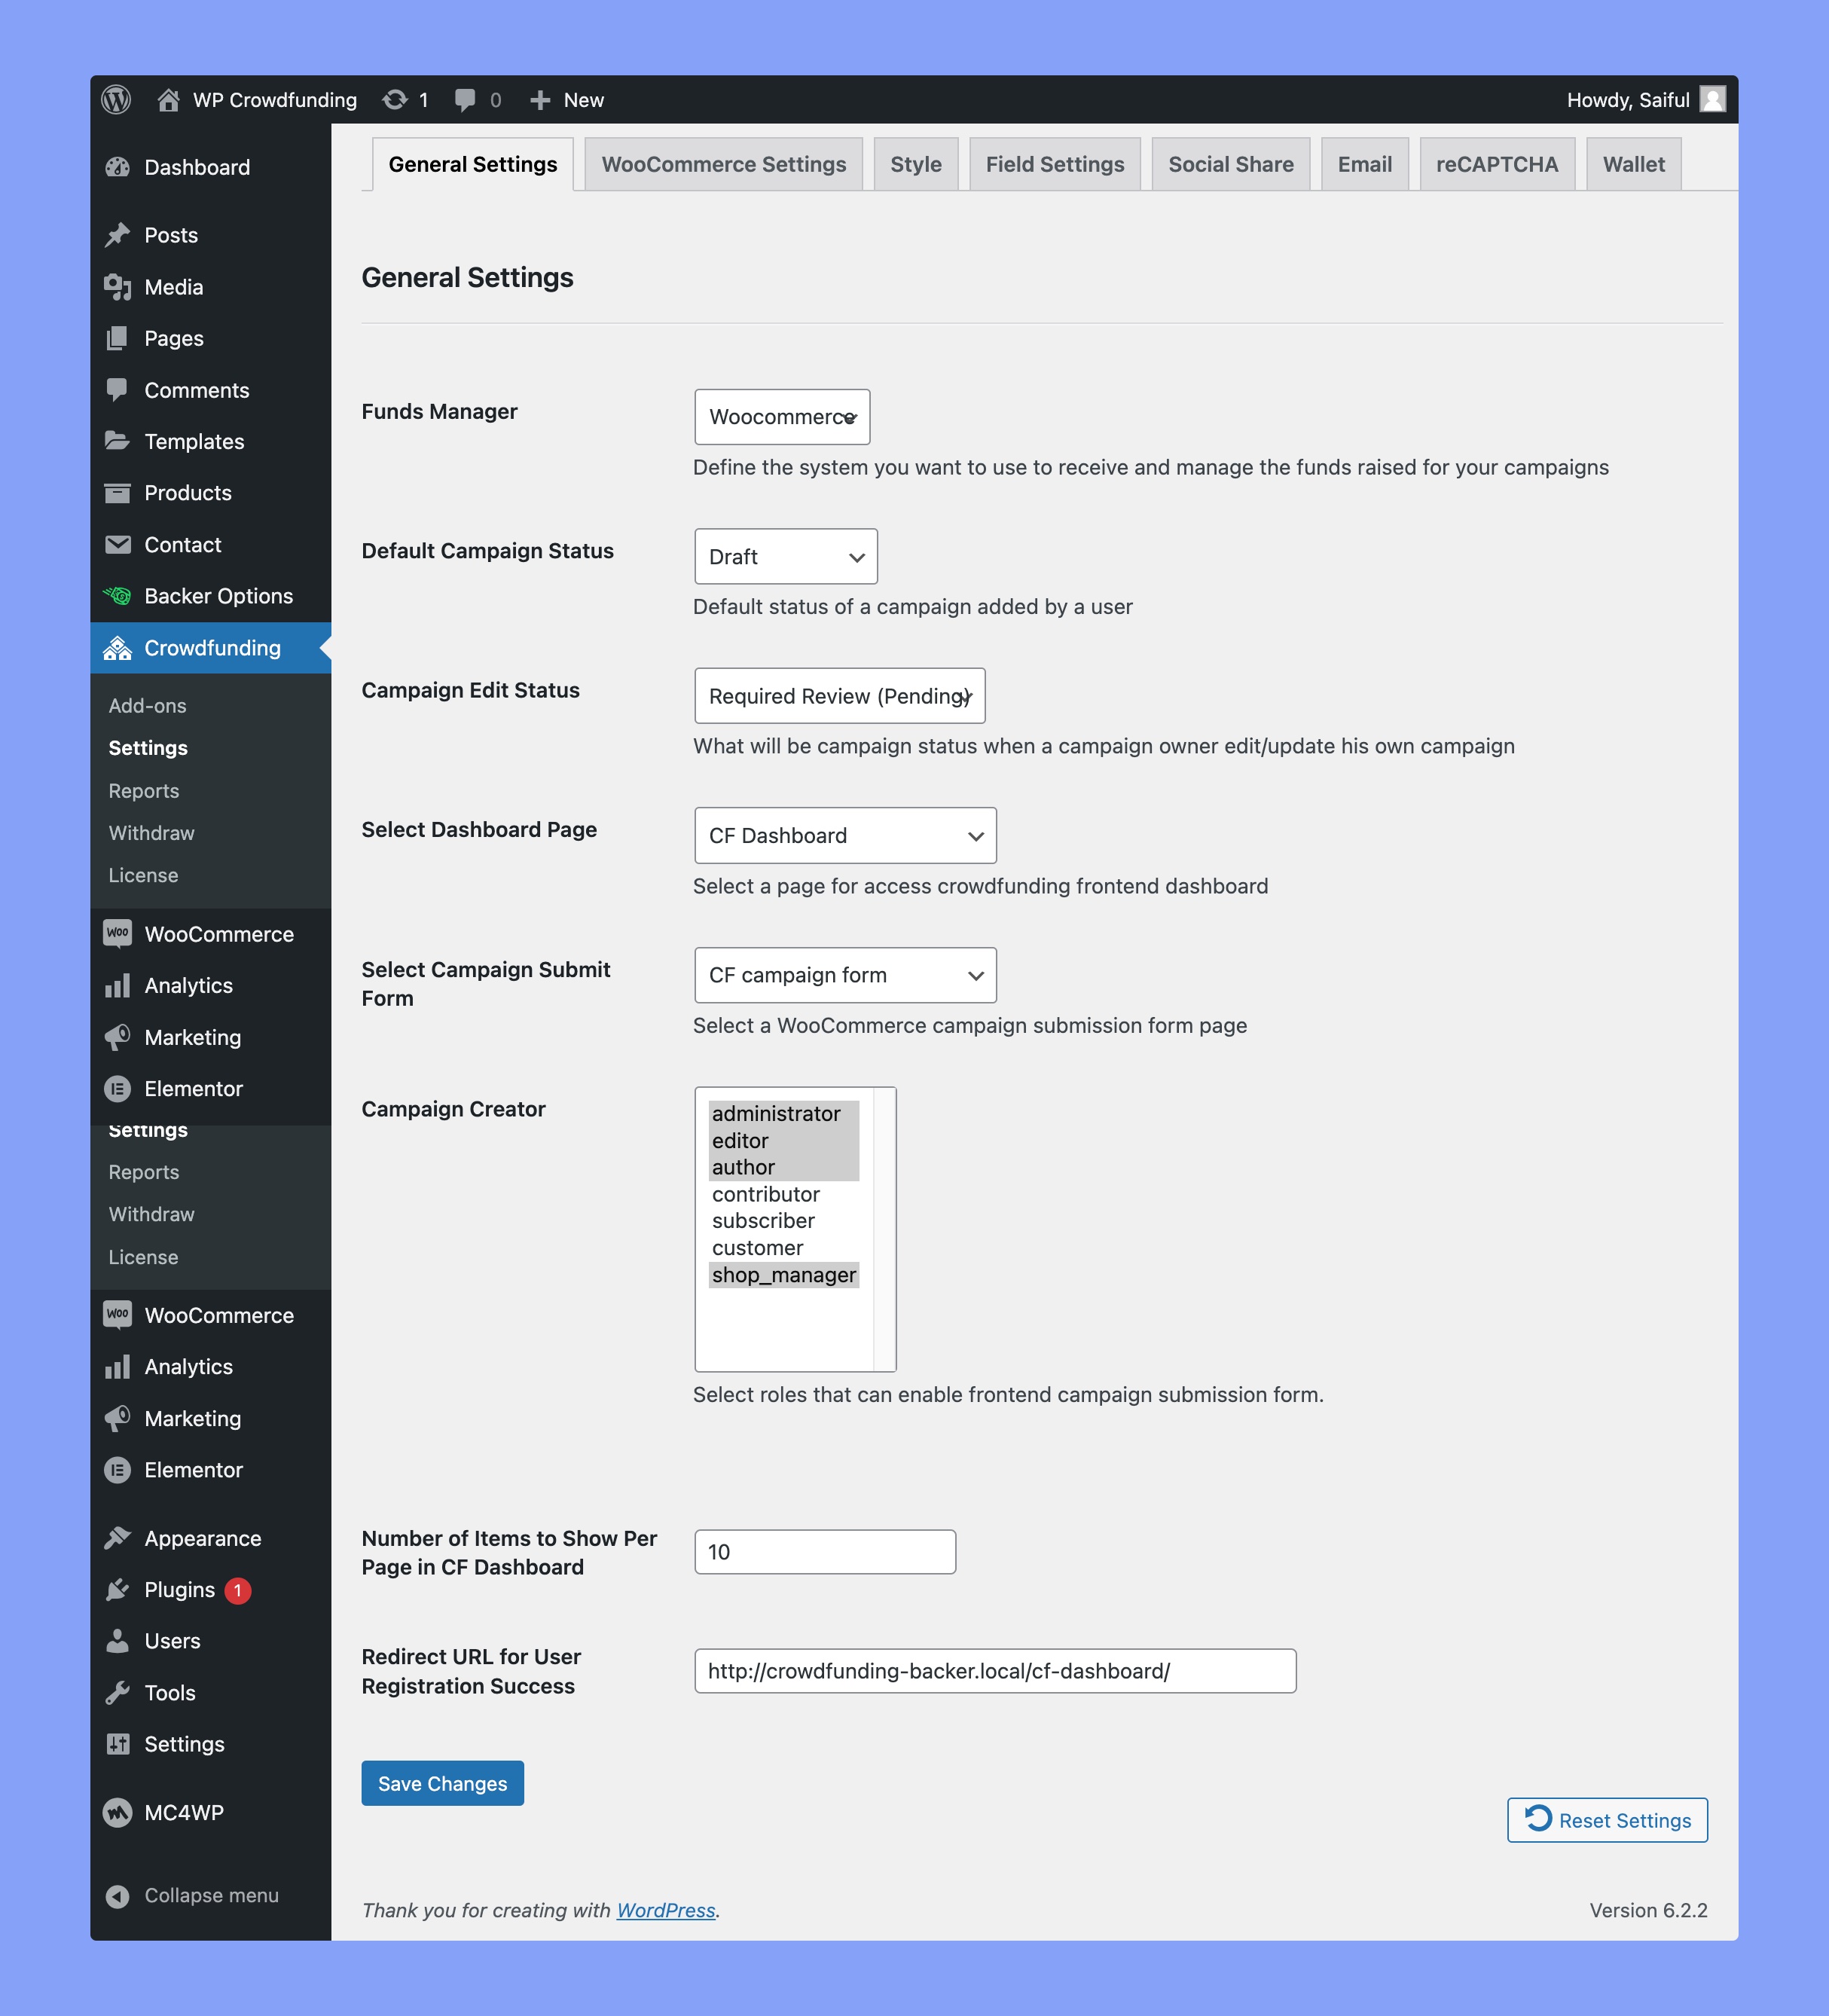
The general settings tab is dedicated to the site admin. Site admin will decide how the users will run a campaign on this site. Here, the available options are:
- Funds Manager: Since WP Crowdfunding is based on WooCommerce, it’s highly recommended to use WooCommerce as the fund manager.
- Default Campaign Status: Set the default status for newly created campaigns, such as “Draft,” “Pending Review,” or “Published,” to control their visibility and progress within the crowdfunding platform. If it’s set to “Draft” or “Pending Review” the item would be found under WP Dashboard > Products > All Products.
- Campaign Edit Status: Choose what will be the campaign status when a campaign owner edit/update his own campaign. The available options are: Campaign remain publish, Required review (pending), and Required review (draft).
- Select Dashboard Page: Here you need to select the page for your dashboard. Please note: A default CF Dashboard Page is provided with WP CF plugin. You can choose the default dashboard page to get a better user experience.
- Select Campaign Submit Form: Here you need to select the campaign form by which the campaign will be created. (Please note: A default CP Campaign Form is provided with the WP Crowdfunding plugin.)
- Campaign Creator: From this drop-down menu the site admin will determine which role will have the access to create a new campaign. To select multiple roles, you need to hold (Ctrl/Cmd) and select the user roles from the select box.
- Number of Items to Show Per Page in CF Dashboard: Decide how many campaigns you want to display in the dashboard.
- Redirect URL for User Registration Success: It’s pretty self-explanatory. You can determine the URL of which page (like a thank you page) you want your user to go after a successful registration.
WooCommerce Settings
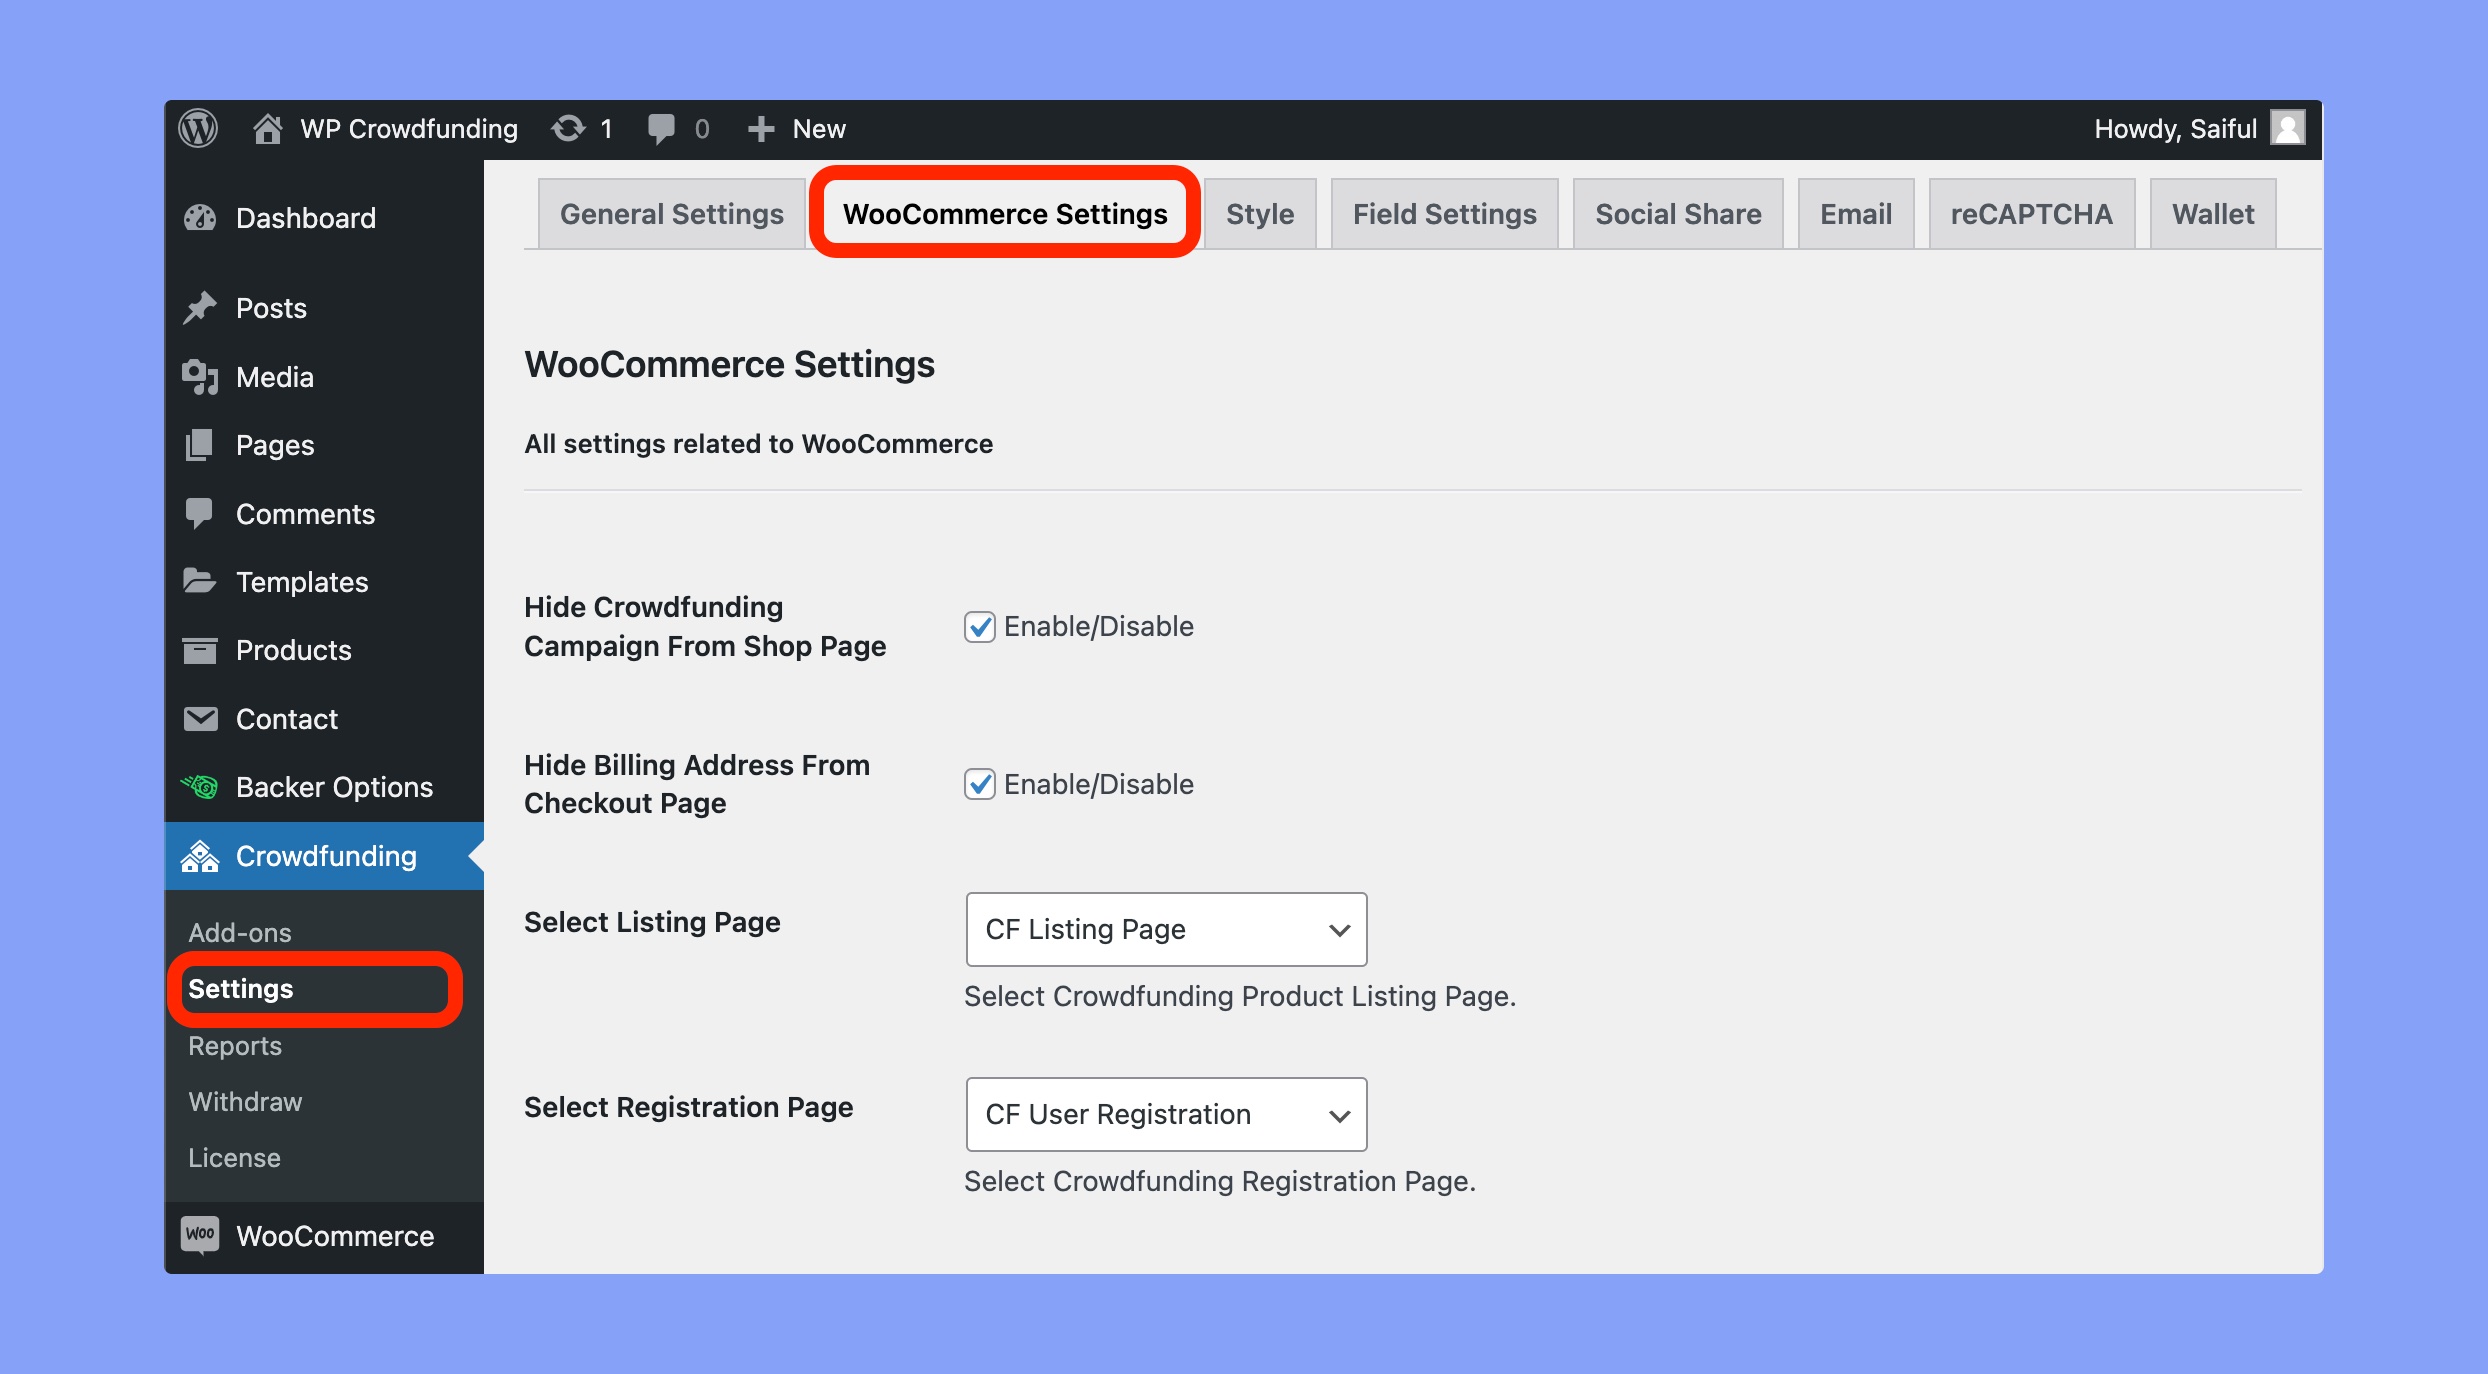
You can access the crowdfunding WooCommerce settings from WP Dashboard > Crowdfunding > Settings > WooCommerce Settings tab. There, you can update the following WooCommerce settings:
- Hide Crowdfunding Campaign From Shop Page: If you have a dedicated shop page, you can hide your campaigns from that by simply enabling this.
- Hide Billing Address From Checkout Page: As the crowdfunding campaigns are listed as digital/virtual product, so you don’t need the billing address for these. So, you can hide the billing address from the checkout page by enabling this option.
Note: If you enable this option, user’s cannot donate via the Cash on Delivery option. - Select Listing Page: Select the page where you want to show all the campaign listings/Product listings. It’s highly recommended to select the default “CF listing page”. You can also create a personal listing page using Crowdfunding shortcodes, and select that page from this dropdown list.
- Select Registration Page: Select your registration page from the dropdown list. A default “CF Registration Page” is provided with WP Crowdfunding, we advise you to select that. You can also create a registration page using
[wpcf_registration]shortcode. If you choose a new registration page, make sure to choose that specific page using the dropdown list.
Categories Settings
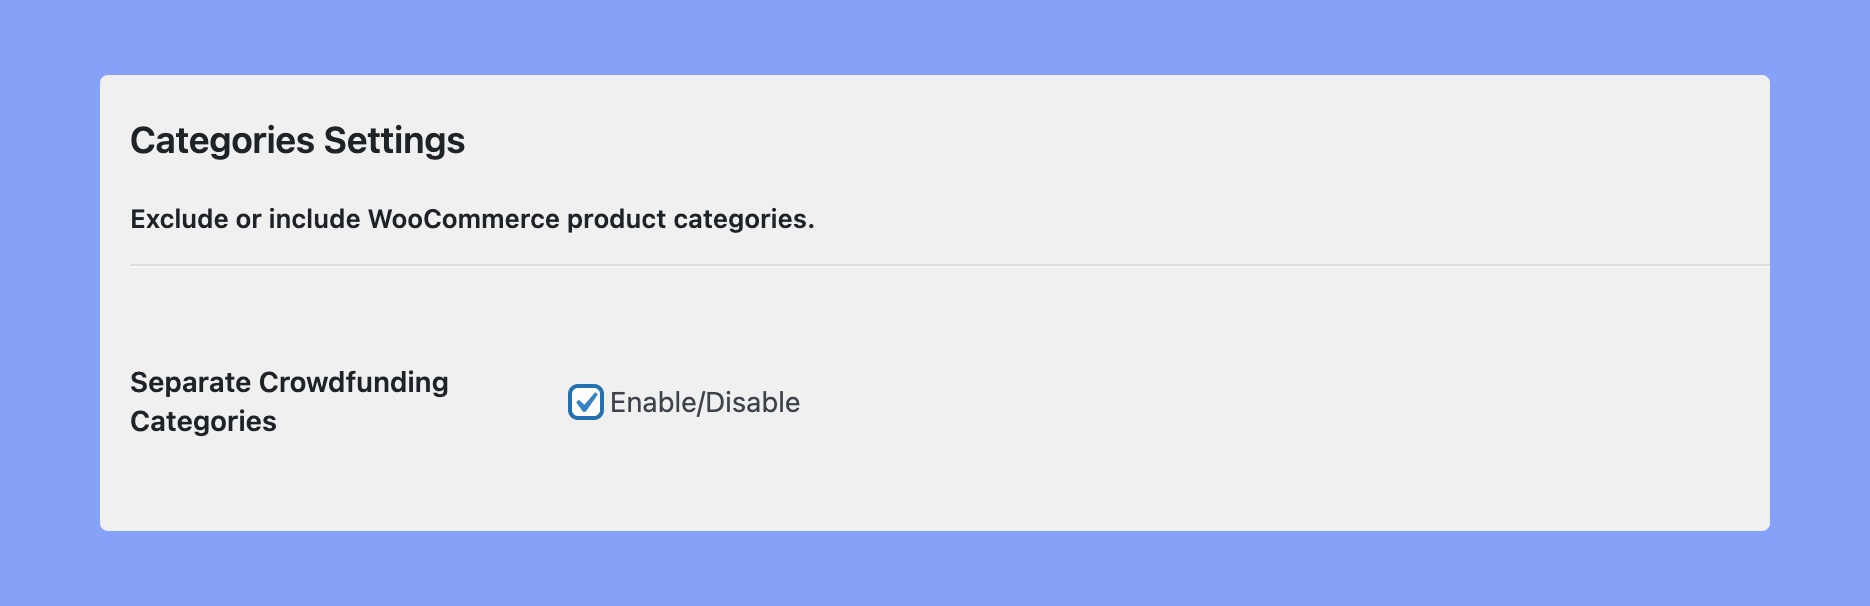
Enable the “Separate Crowdfunding Categories” option if you want to keep your crowdfunding categories separated from the other product categories.
Submit Form Text Settings:
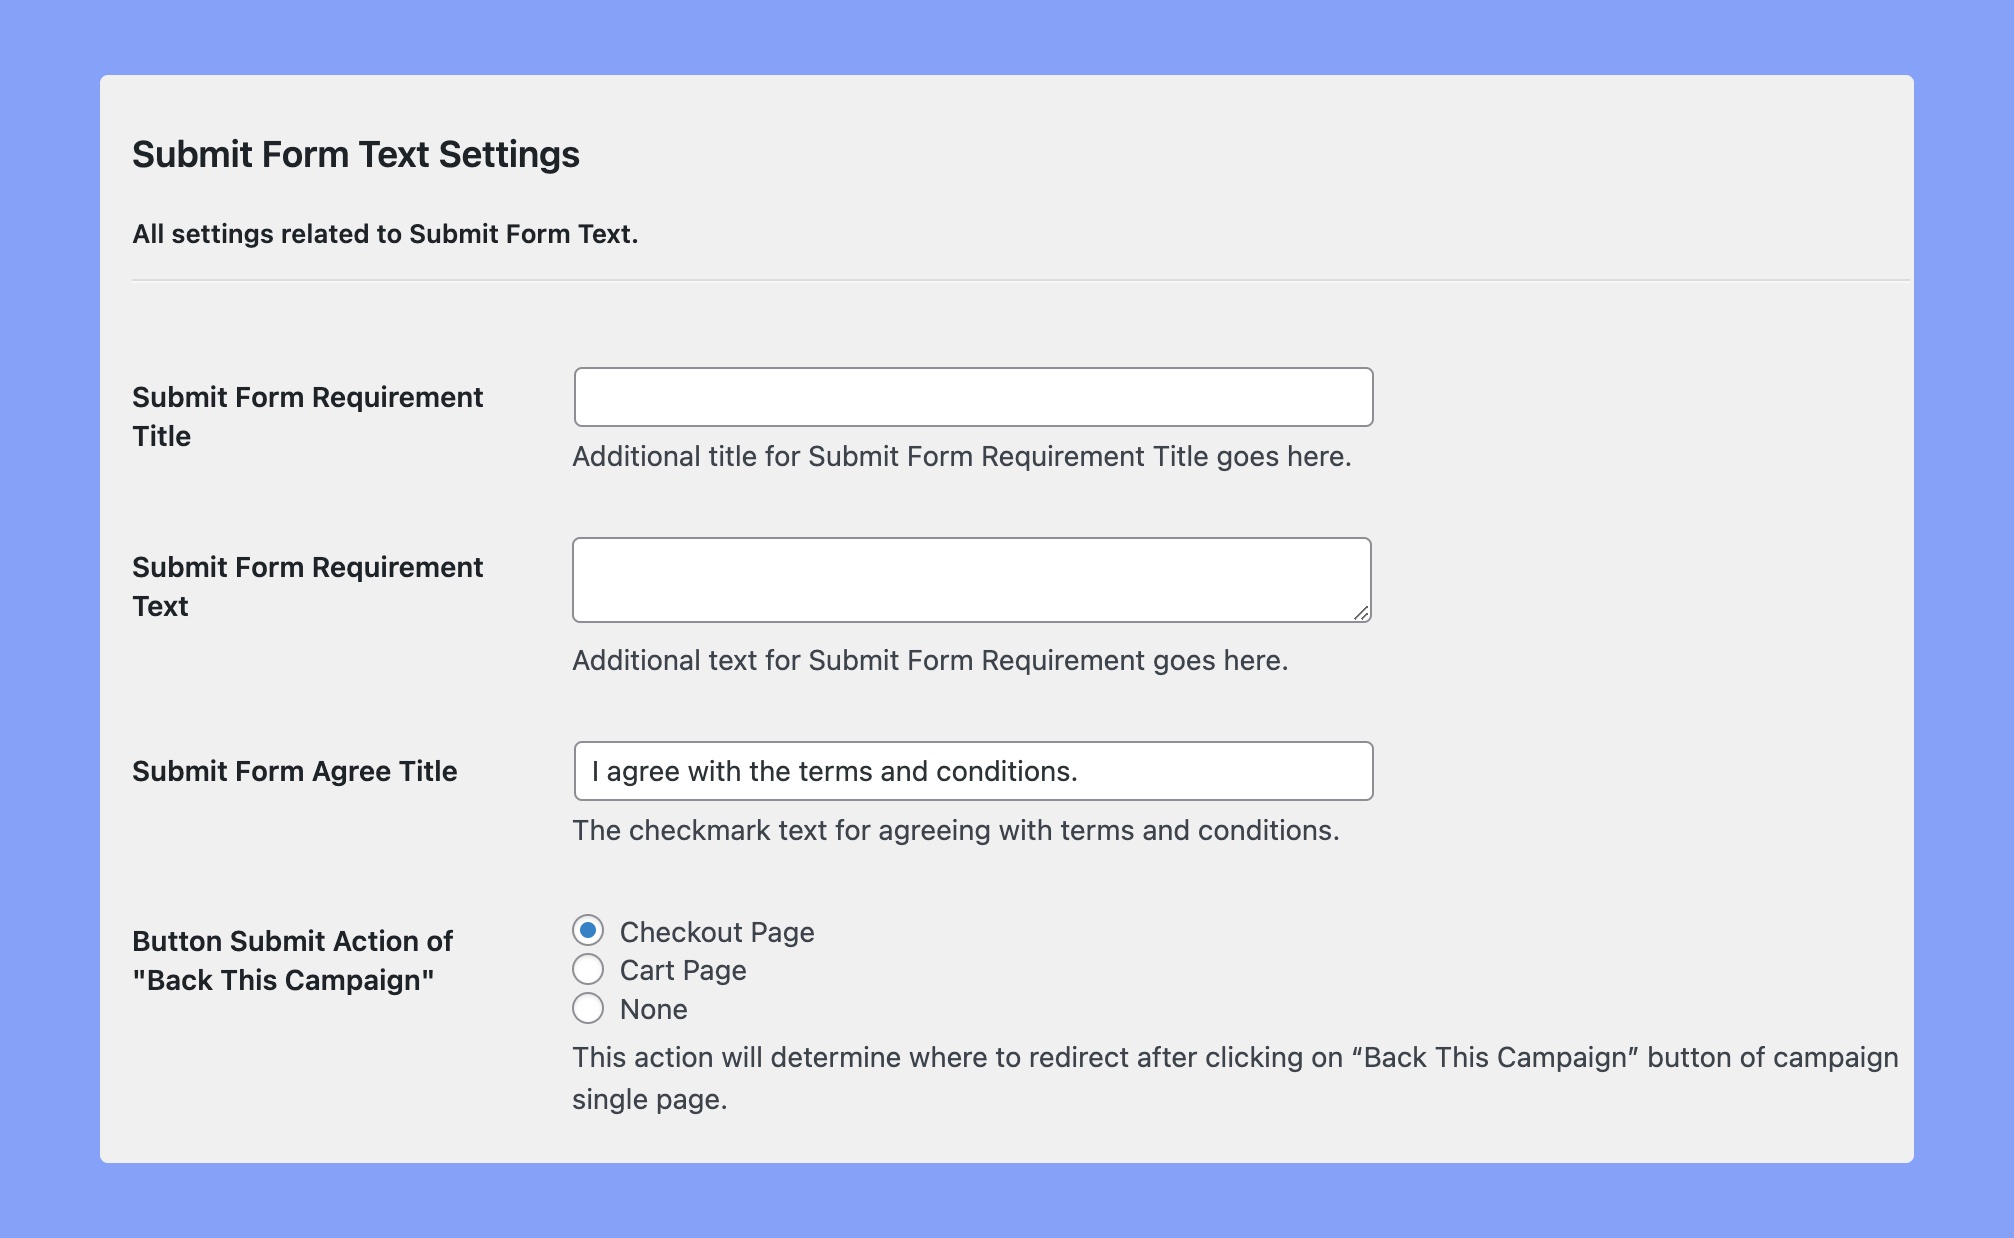
All of the options described below will be available in the Campaign form.
- Submit Form Requirement Title: Set the additional title which will be displayed under the campaign creation form.
- Submit Form Requirement Text: Set the description for the title which will be displayed under the campaign creation form.
- Submit Form Agree Title: It’s the checkmark box for agreeing with the terms and conditions. The default text is “I agree with the terms and conditions.” but you can always change it.
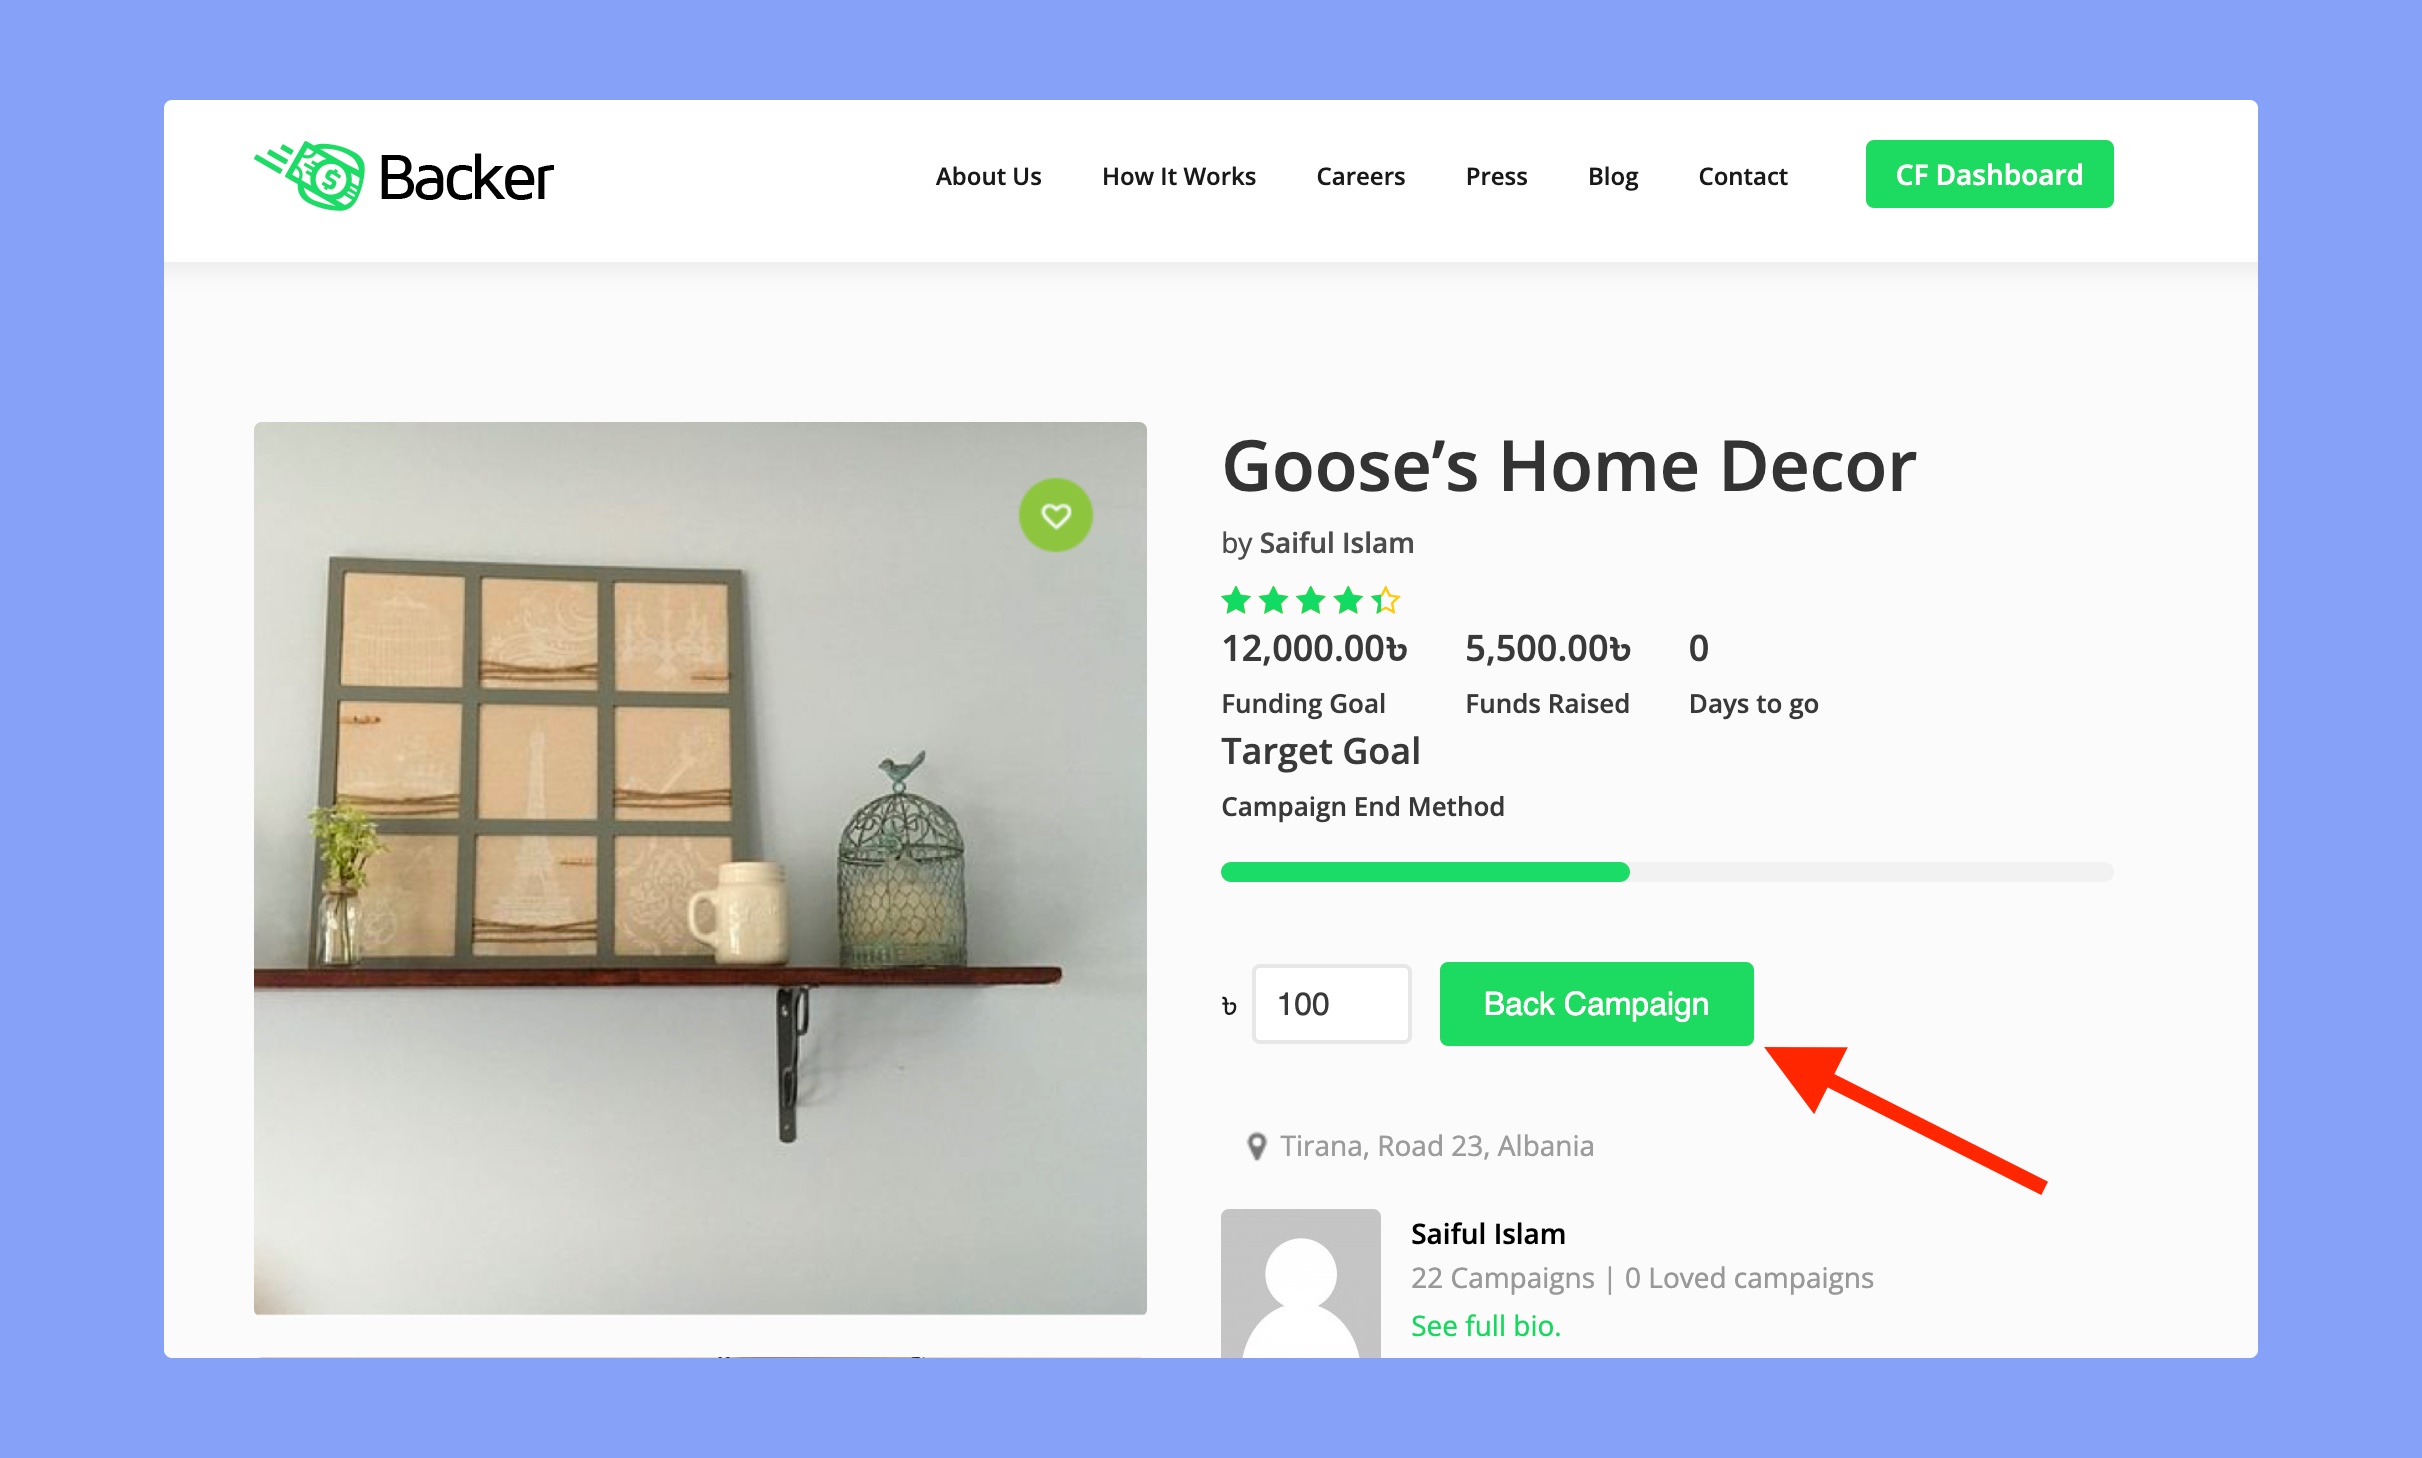
- Redirect after Back This Campaign Button submit: This action will determine what will happen after clicking on the “Back Campaign” button on the single campaign page. The users will be redirected to your selected pages when they click on the “Back Campaign” button in order to donate on that campaign. It’s recommended to select “Checkout Page”.
The “Back Campaign” button will be visible on the single campaign page. Here’s the preview:
Listing Page Settings
You can update the visual presentation of the campaign list on the listing page from this settings.
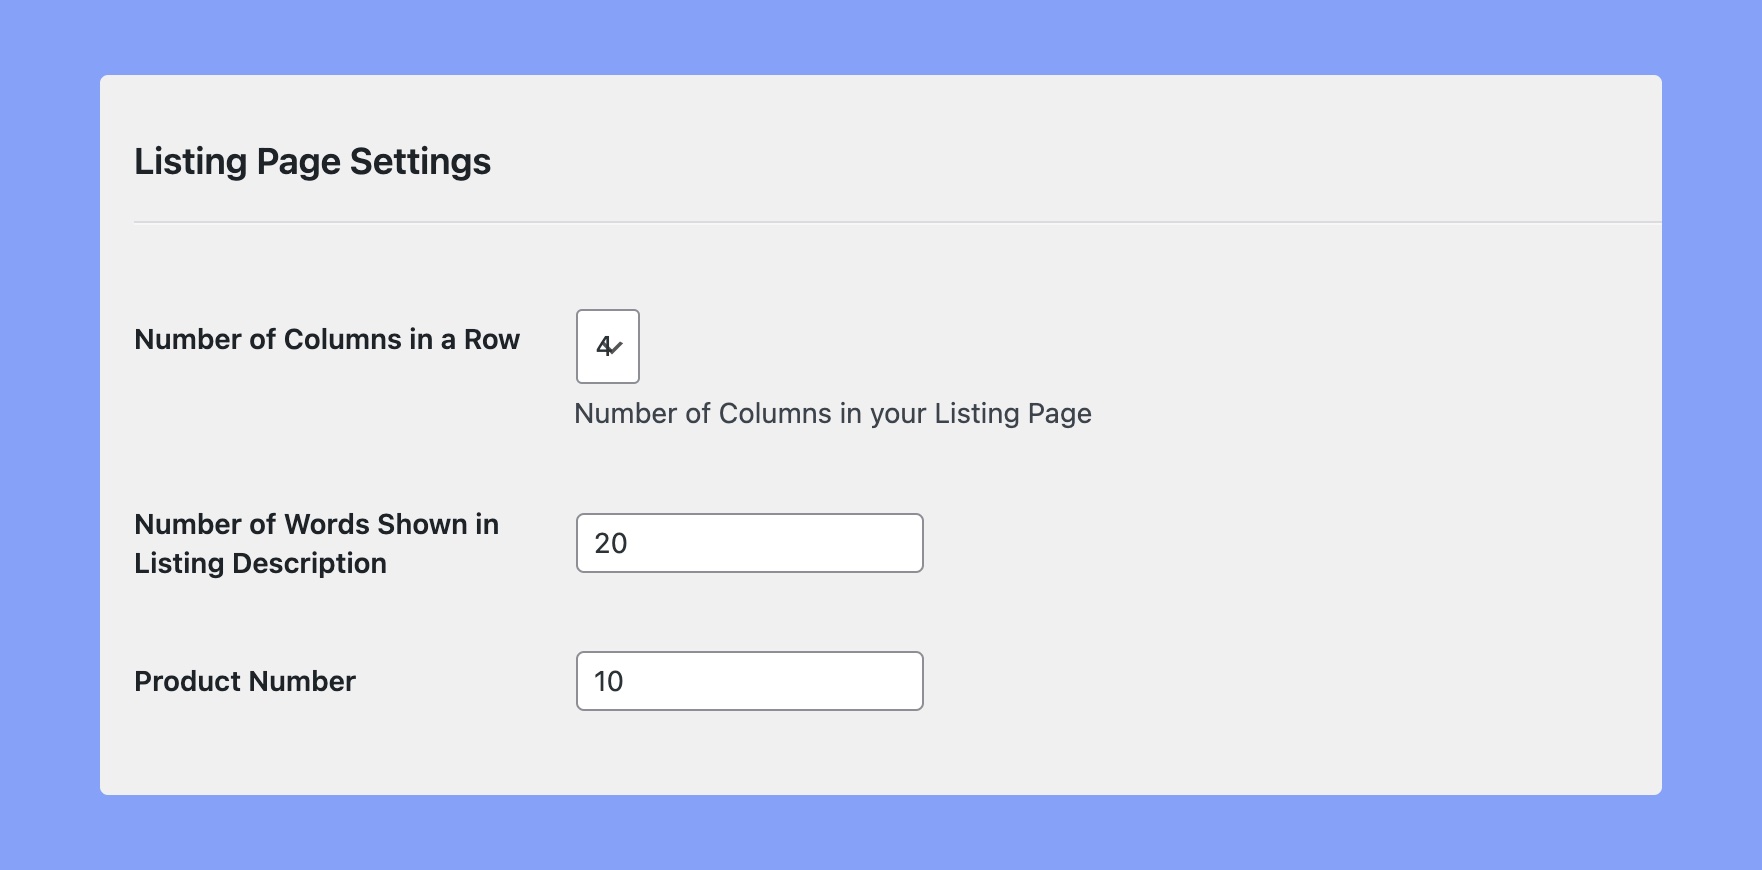
- Number of Columns in a Row: You can change how many columns will be shown on the listing page from here. The preset value are 2,3 and 4.
- Number of Words Shown in Listing Description: You can limit the words you want to show in the list description from here.
- Product Number: Limit how many products/campaigns you want to display on the listing page.
Single Page Settings
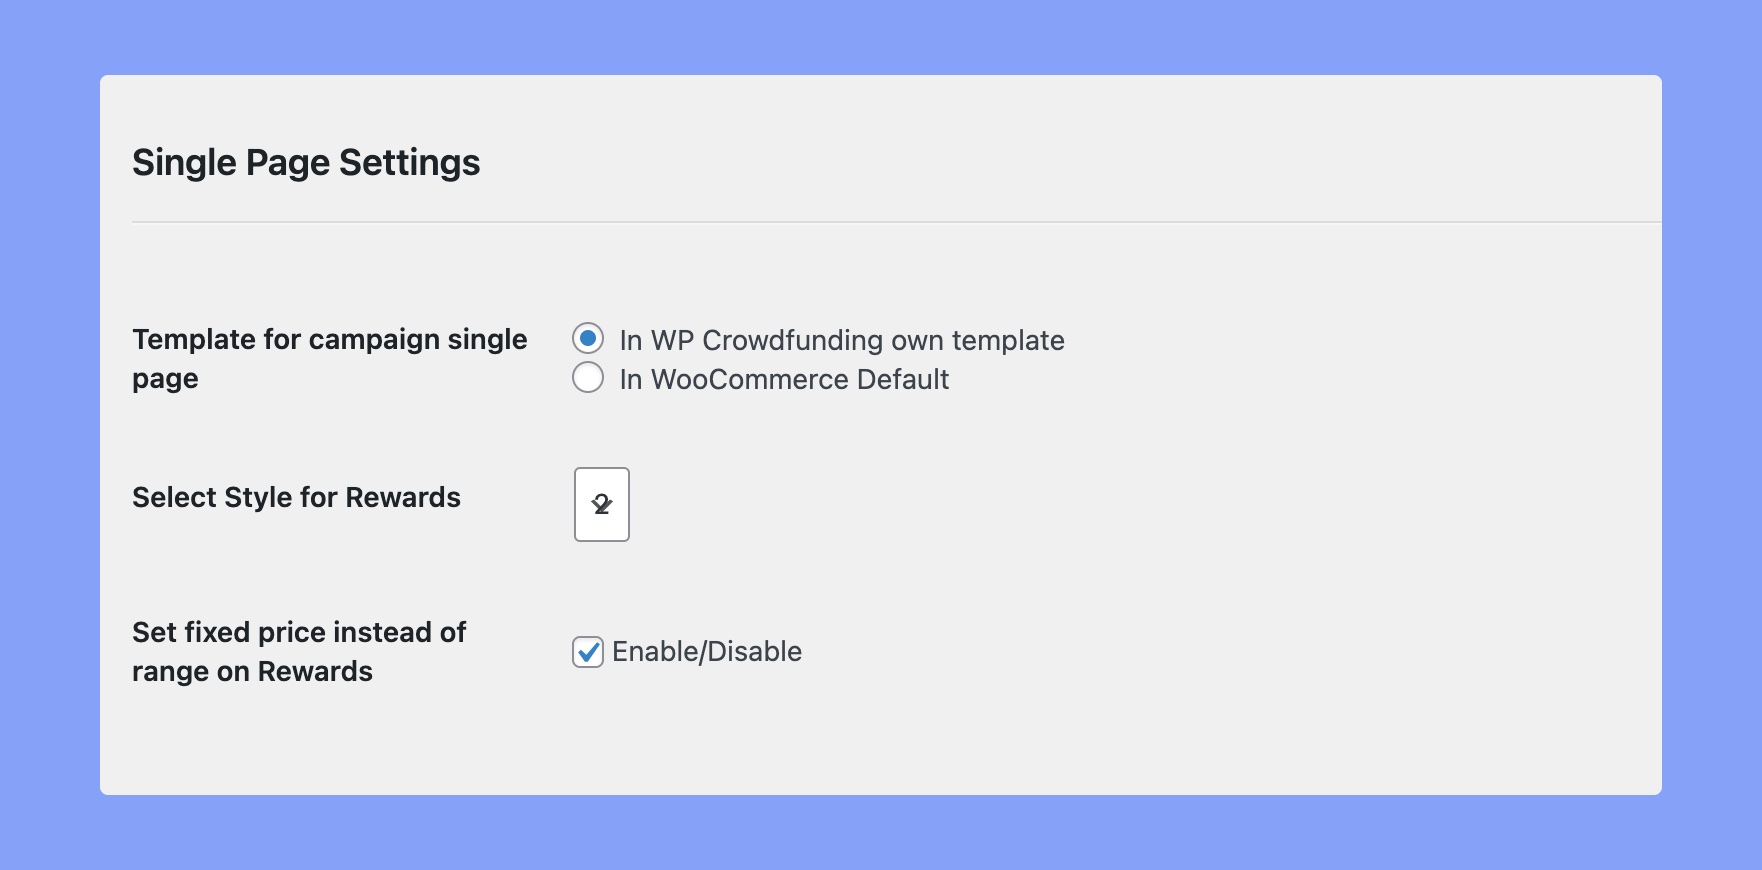
- Load single campaign template: You can choose whether you want to use the default WooCommerce campaign template or the WP Crowdfunding template.
- Rewards design in single page: WP Crowdfunding provides two design templates. You can alternate the design by selecting 1 or 2.
- Reward show fixed price not range: If you don’t like to have a range on Rewards, you can set a fixed amount by enabling this option.
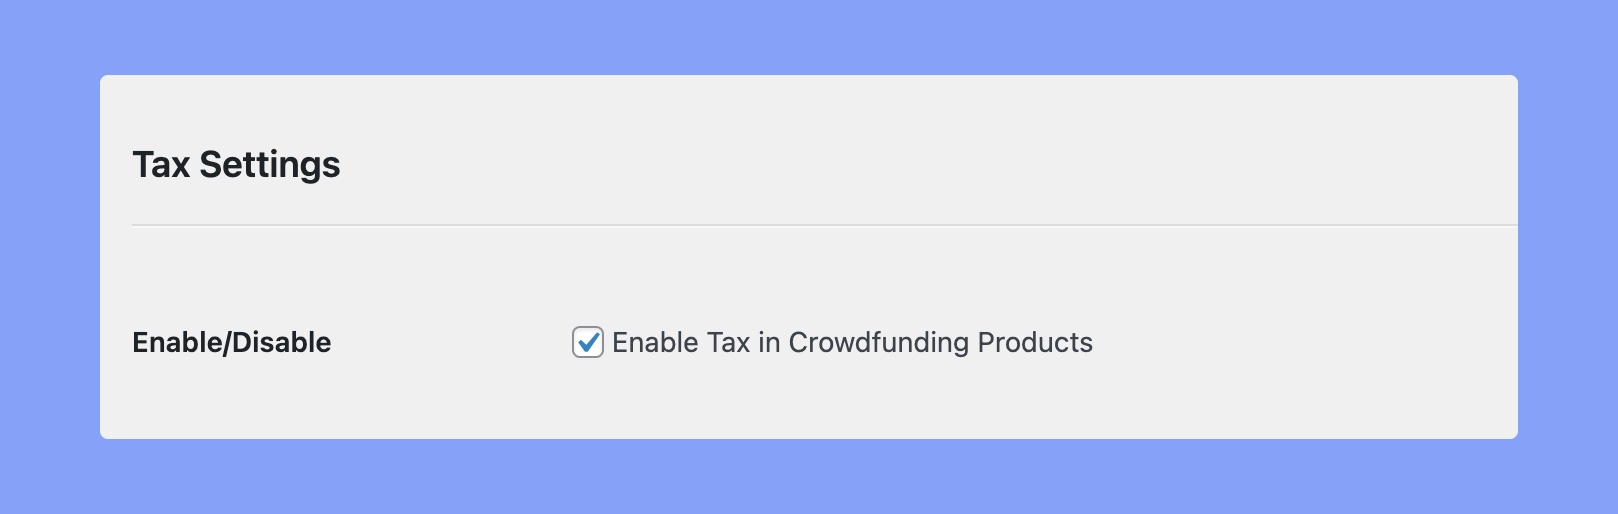
Tax Settings
If you want to apply tax charges, please enable this option. Once enabled, donors will see the donation amount including the tax on the checkout page.
However, you have to setup the Tax setting from WooCommerce in order to charge tax to the donors. Tax settings can be found in WP Dashboard > WooCommerce > Settings > General tab. Put a checkmark beside Enable Taxes option and save changes. Then a Tax tab will appear on the WooCommerce settings page. Setup your taxation and WP Crowdfunding will charge the donors based on your settings.
Pay full to Campaign Owner Settings
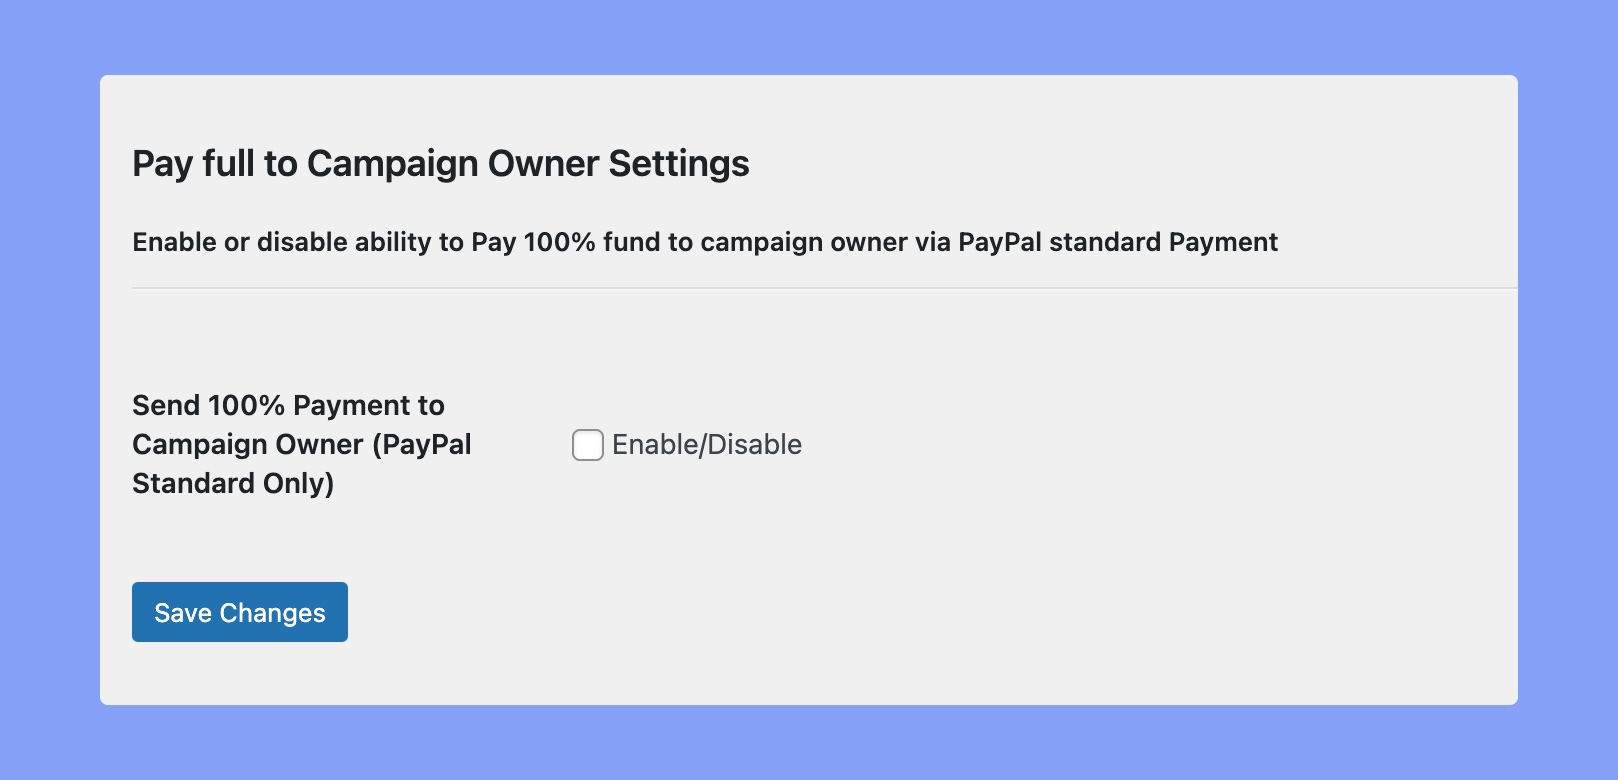
Send 100% Payment to Campaign Owner (PayPal Standard Only): Enable this option only if you (the site admin) want to pay 100% of the donation amount to the campaign owner. Please note that, this option is only available for PayPal Standard.
Style Tab
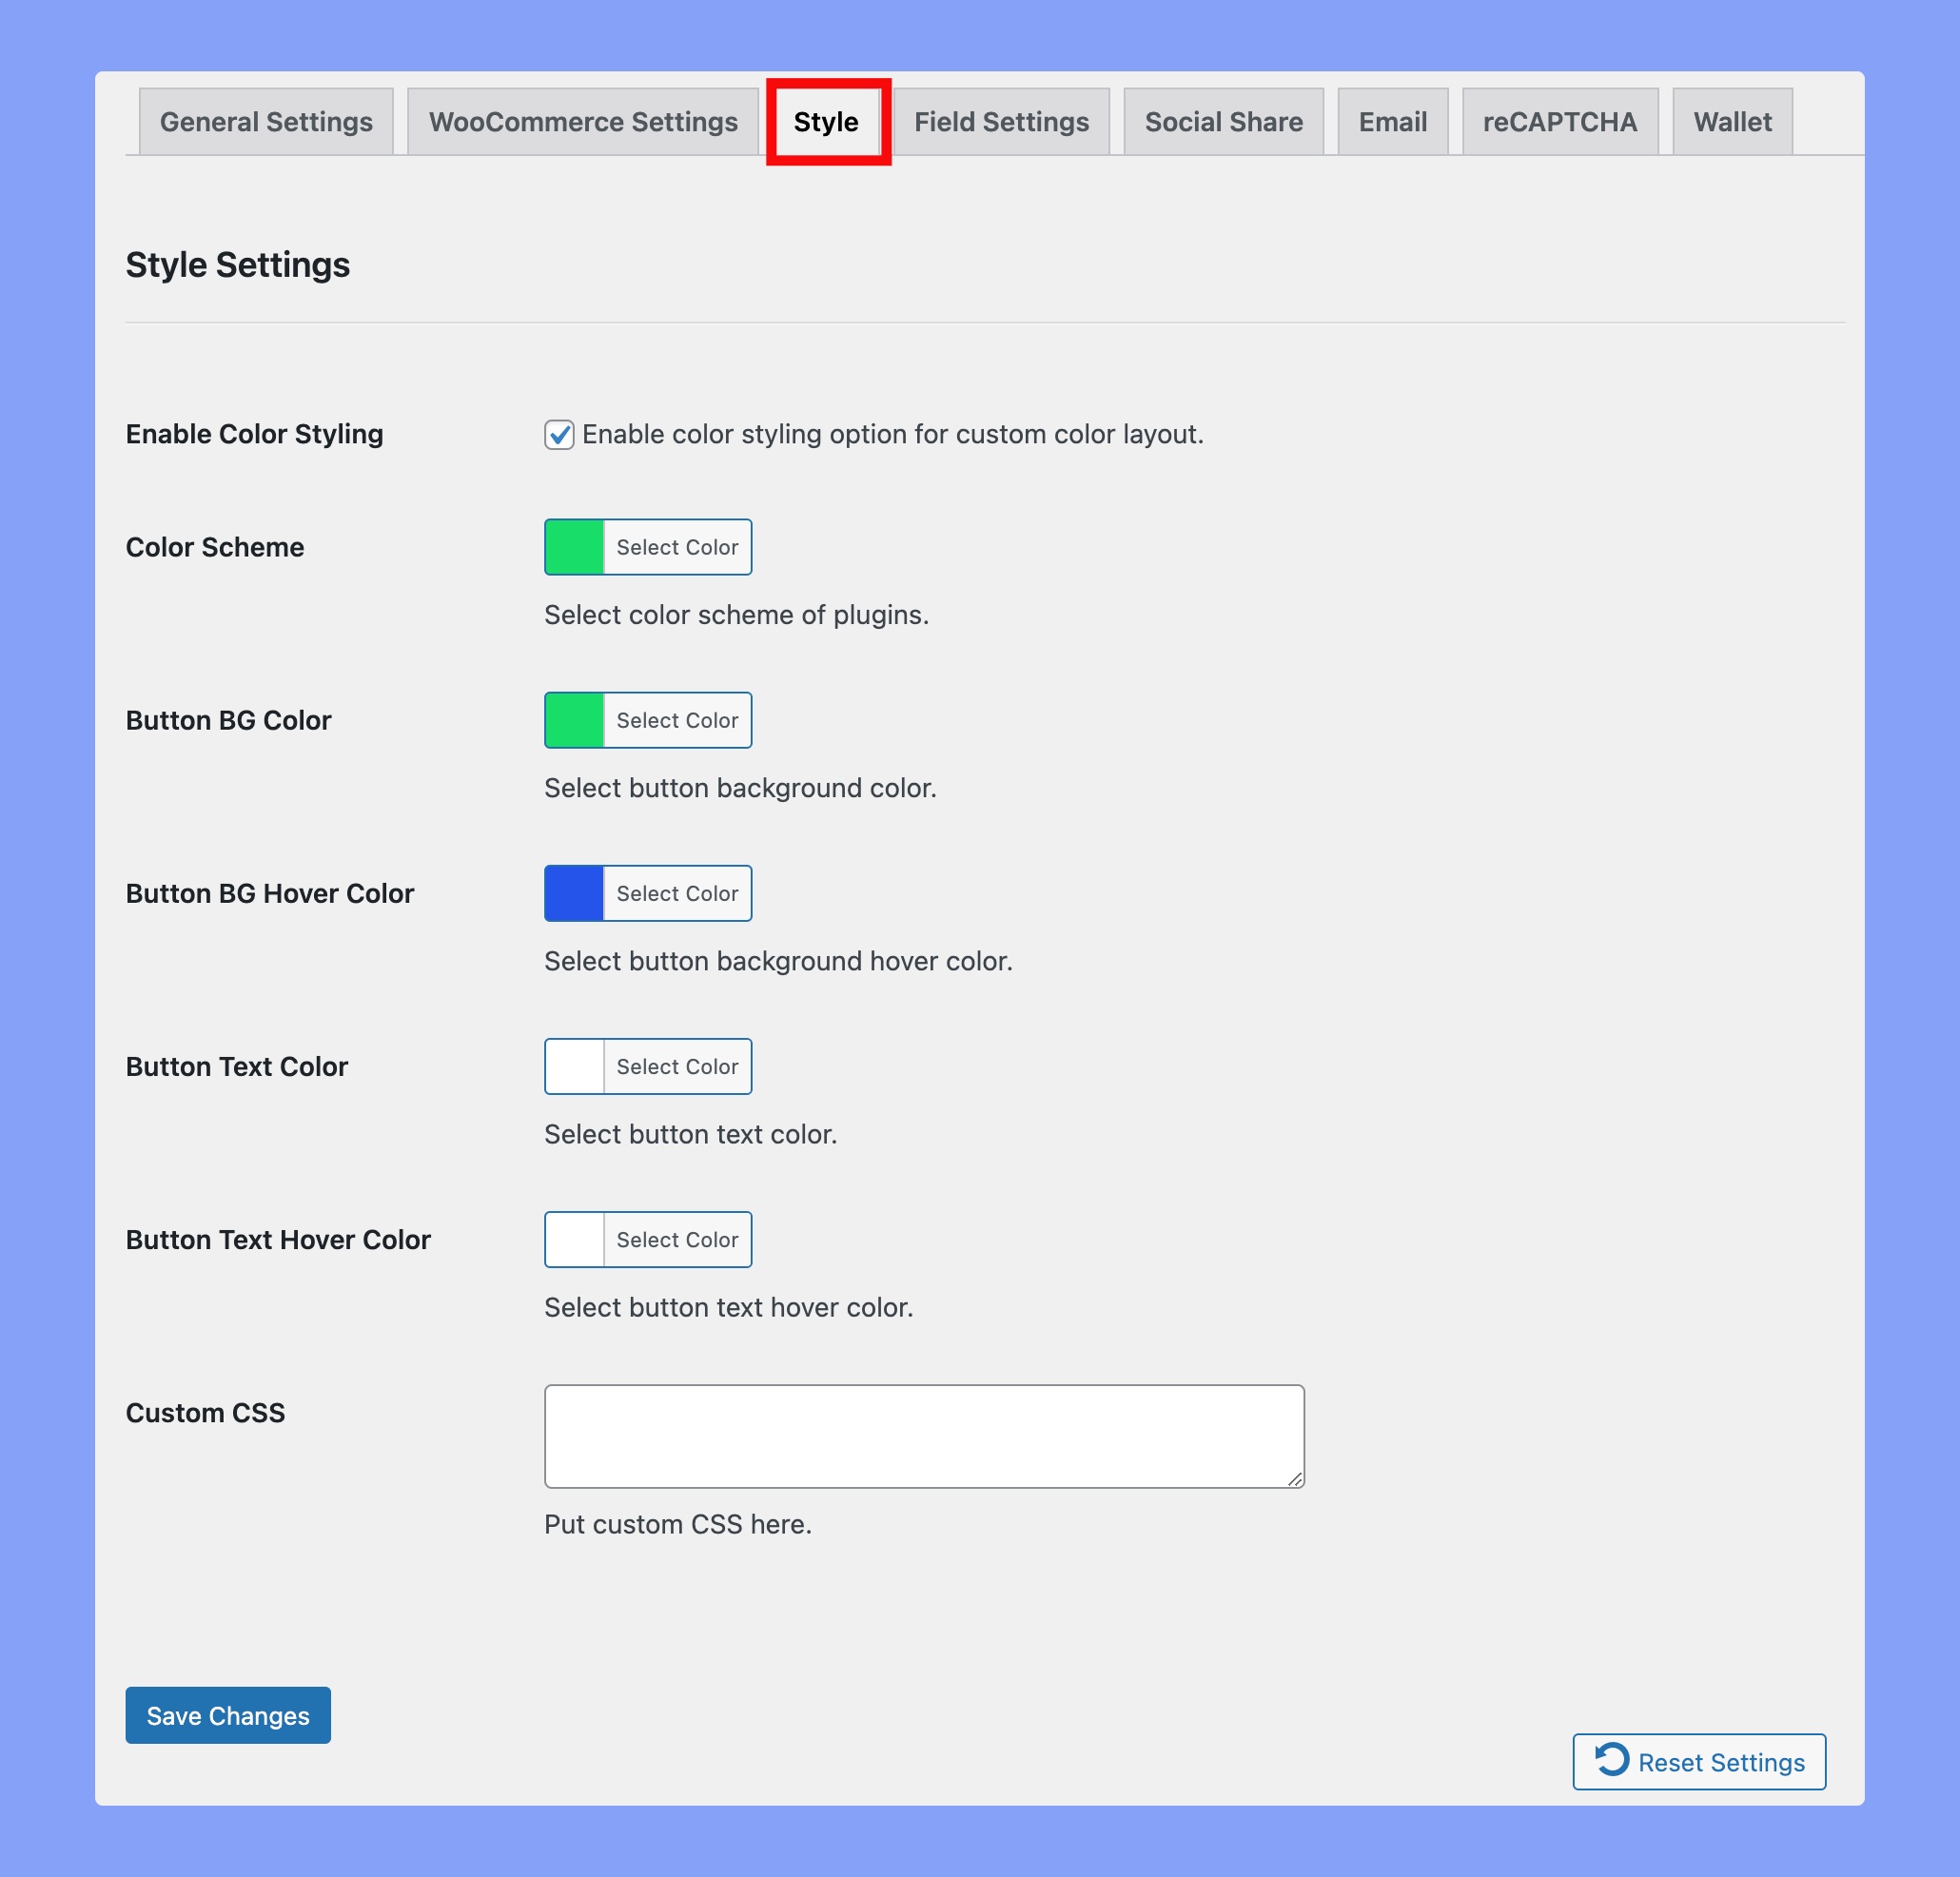
All the functions of this tab are pretty self-explanatory. All the changes you make here will change the view of the campaign page. Here are the available pages:
- Enable Color Styling: Customize the visual appearance of your crowdfunding platform by enabling the color styling feature.
- Color Scheme: Choose from a variety of predefined color schemes to instantly change the overall look and feel of your crowdfunding platform, matching your brand or website design.
- Button BG Color: Define the background color of buttons used throughout the crowdfunding platform.
- Button BG Hover Color: Specify the background color of buttons when hovered over by users.
- Button Text Color: Set the color of the text displayed on buttons, allowing for clear and easy-to-read call-to-action prompts.
- Button Text Hover Color: Customize the color of button text when users hover over them.
- Custom CSS: Apply custom CSS code to further personalize and modify the visual elements of your crowdfunding platform, giving you complete control over the design and layout.
Field Settings of the Campaign submission form
From this part of the WP Crowdfunding settings, you will be able to enable/disable certain sections of the campaign submission form.

Here are the available options in the field settings tab:
- Description: Use this field to describe the campaign in details.
- Short Description: Enable a concise summary field for campaign creators to provide a brief overview of their campaign.
- Category: Categorize campaigns into predefined categories for easier discovery.
- Tag: Assign relevant tags to campaigns for better search and filtering.
- Feature Image: Allow campaign creators to upload an image representing their campaign.
- Video: Enable campaign creators to add a video to their campaign. This video will be displayed on the feature video on the campaign details page.
- Campaign End Method: Specify how a campaign will end based on duration, funding goal, or both.
- Show Target Goal: Display the funding goal to track progress and contributions.
- Show Target Date: Let campaign creators set the start and end dates using a time picker.
- Show Target Goal & Date: Display the end date and funding goal for campaign conclusion.
- Show Campaign Never End: Allow campaigns with no specific end date.
- Start Date: Include a start date-time picker for campaign initiation.
- End Date: Specify the date and time when the campaign will conclude.
- Enable Minimum/Maximum/Recommended Price: Offer options for contribution amounts on the submission form.
- Funding Goal: Showcase the campaign’s monetary target.
- Predefined Pledge Amount: Suggest a contribution amount to potential backers.
- Contributor Table: Display a list of all contributors and their backed amounts on the campaign page.
- Contributor Anonymity: Enable or disable displaying contributor names on the campaign page.
- Country: Provide a field for the campaign’s associated country.
- Location: Include a field for the campaign’s location.
- Reward Image: Upload images for each reward tier.
- Reward: Specify the amount or contribution required for a particular reward.
- Estimated Delivery Month/Year: Indicate the estimated delivery timeframe for rewards.
- Quantity: Set available quantities for reward tiers or products.
- Terms and Conditions: Require agreement to the platform’s terms and conditions.
Social Share
The Social Share tab lets you decide on which platform you want to share your crowdfunding campaigns.
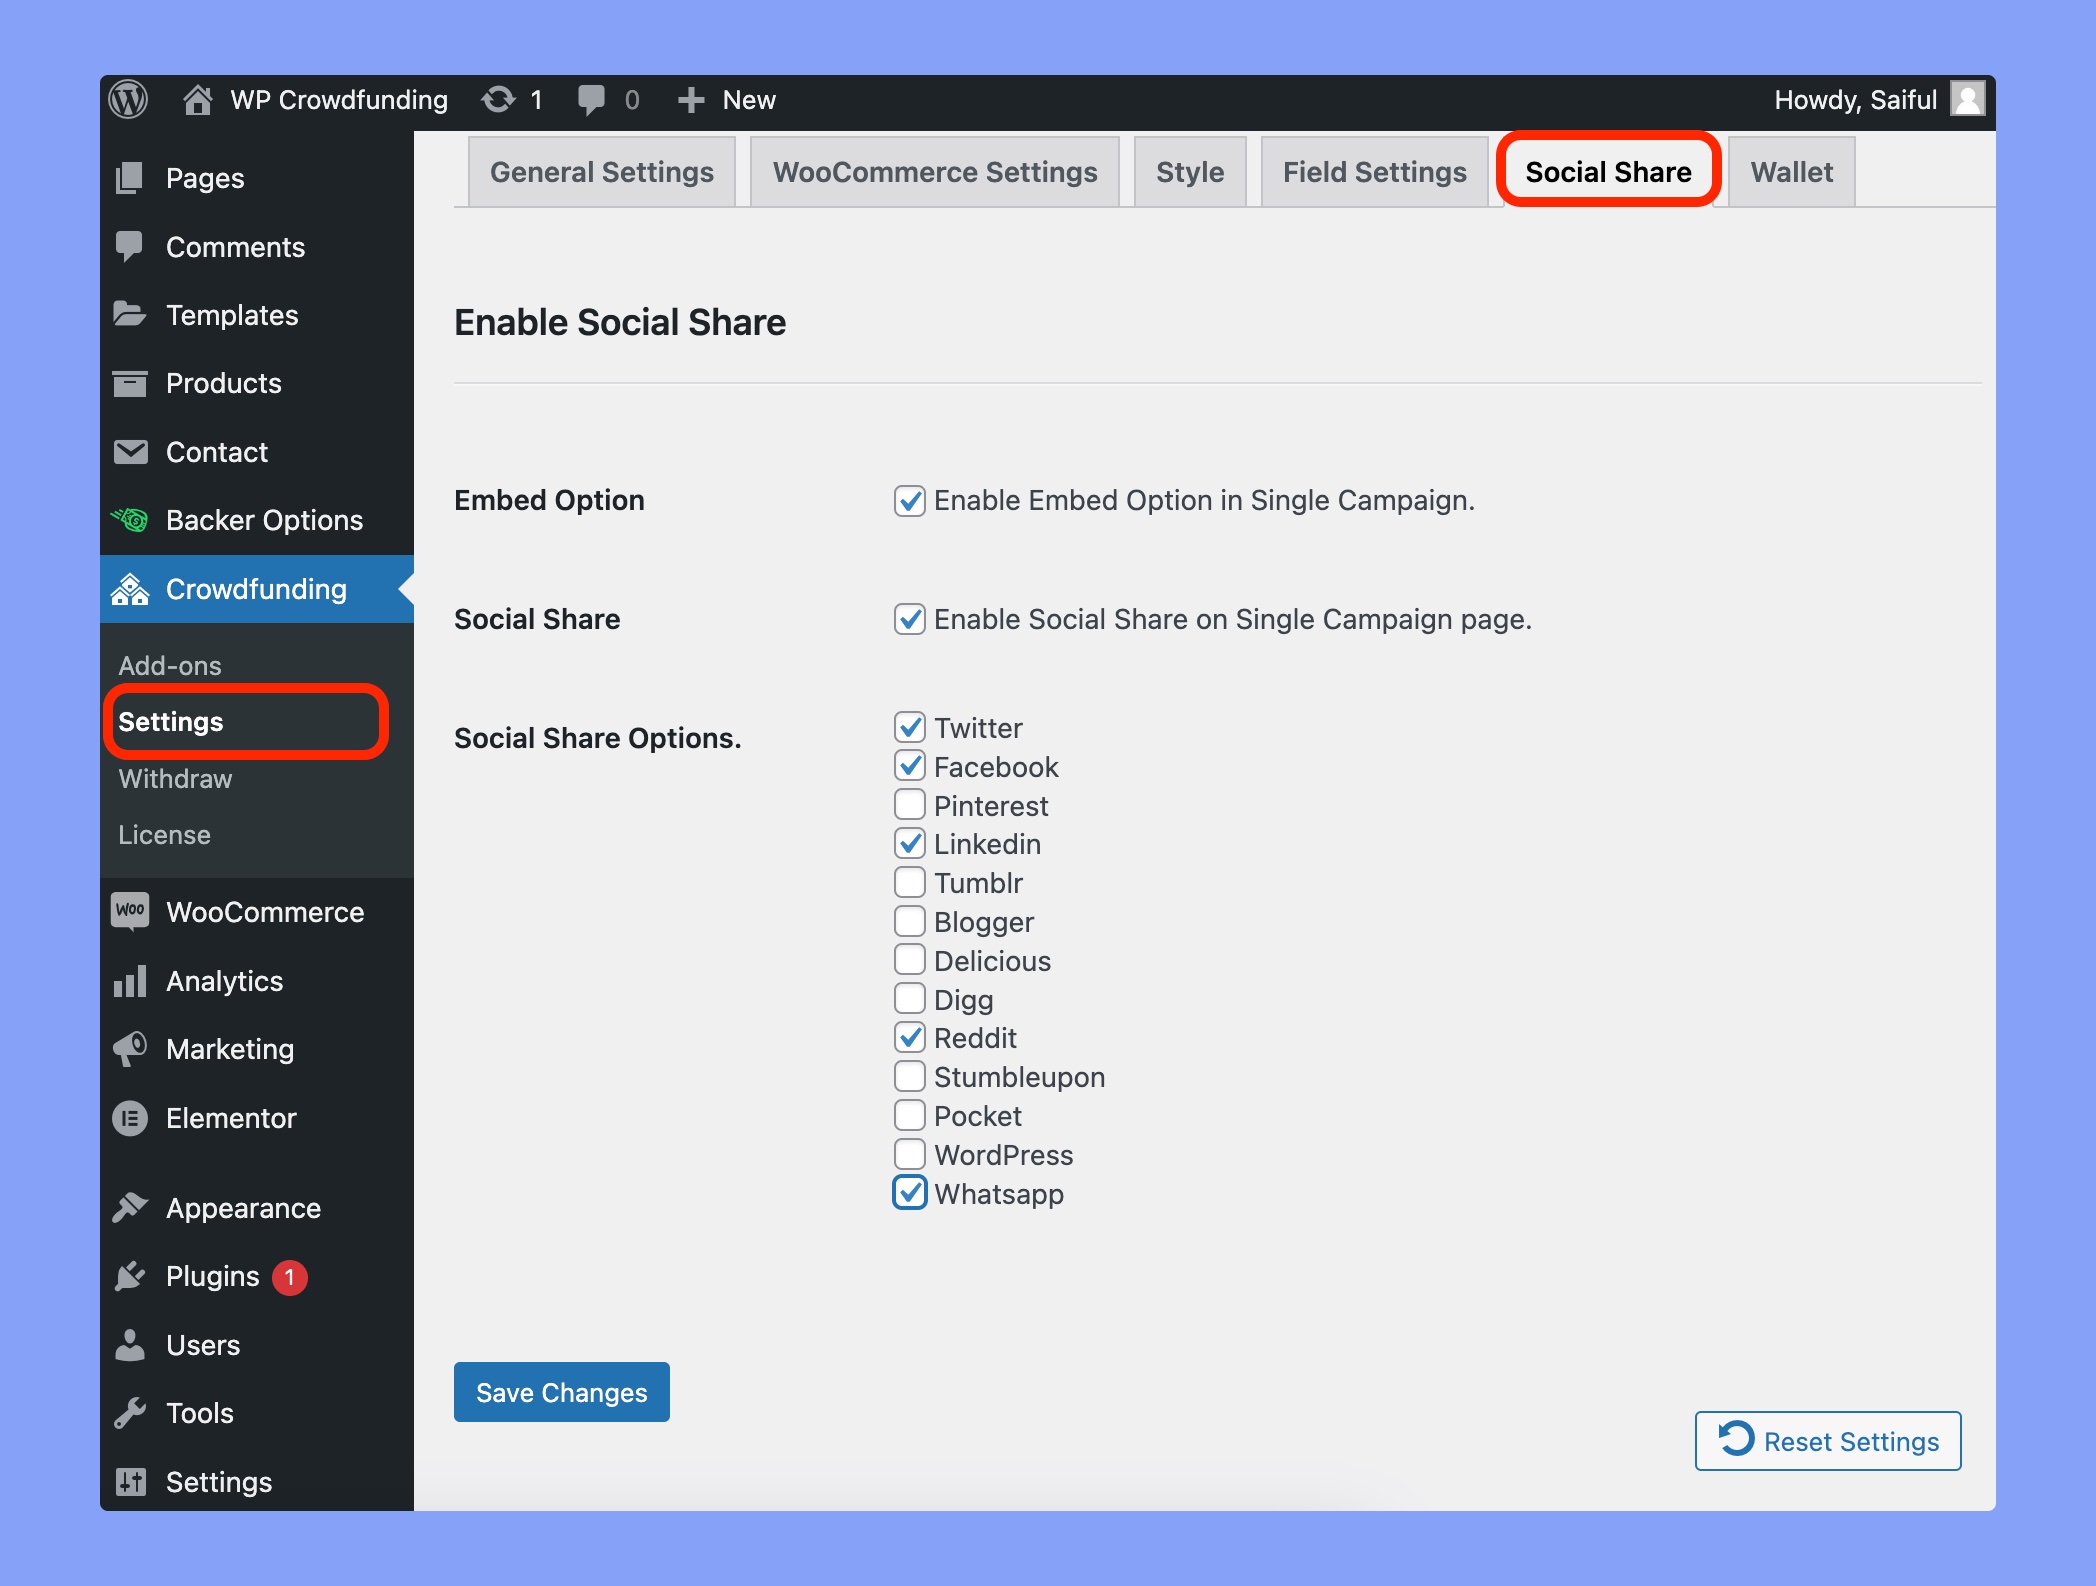
Here, you’ll get the following options:
- Embed Option: By enabling this feature, users will receive a code that can be utilized to embed this campaign on their webpage.
- Social Share: It will enable social share on the single campaign page.
- Social Share Options: Choose the platforms where you want to share your campaign.
Here’s the frontend preview of the social sharing options:
To know more about the activation process of this addon, please check our Social Share documentation.
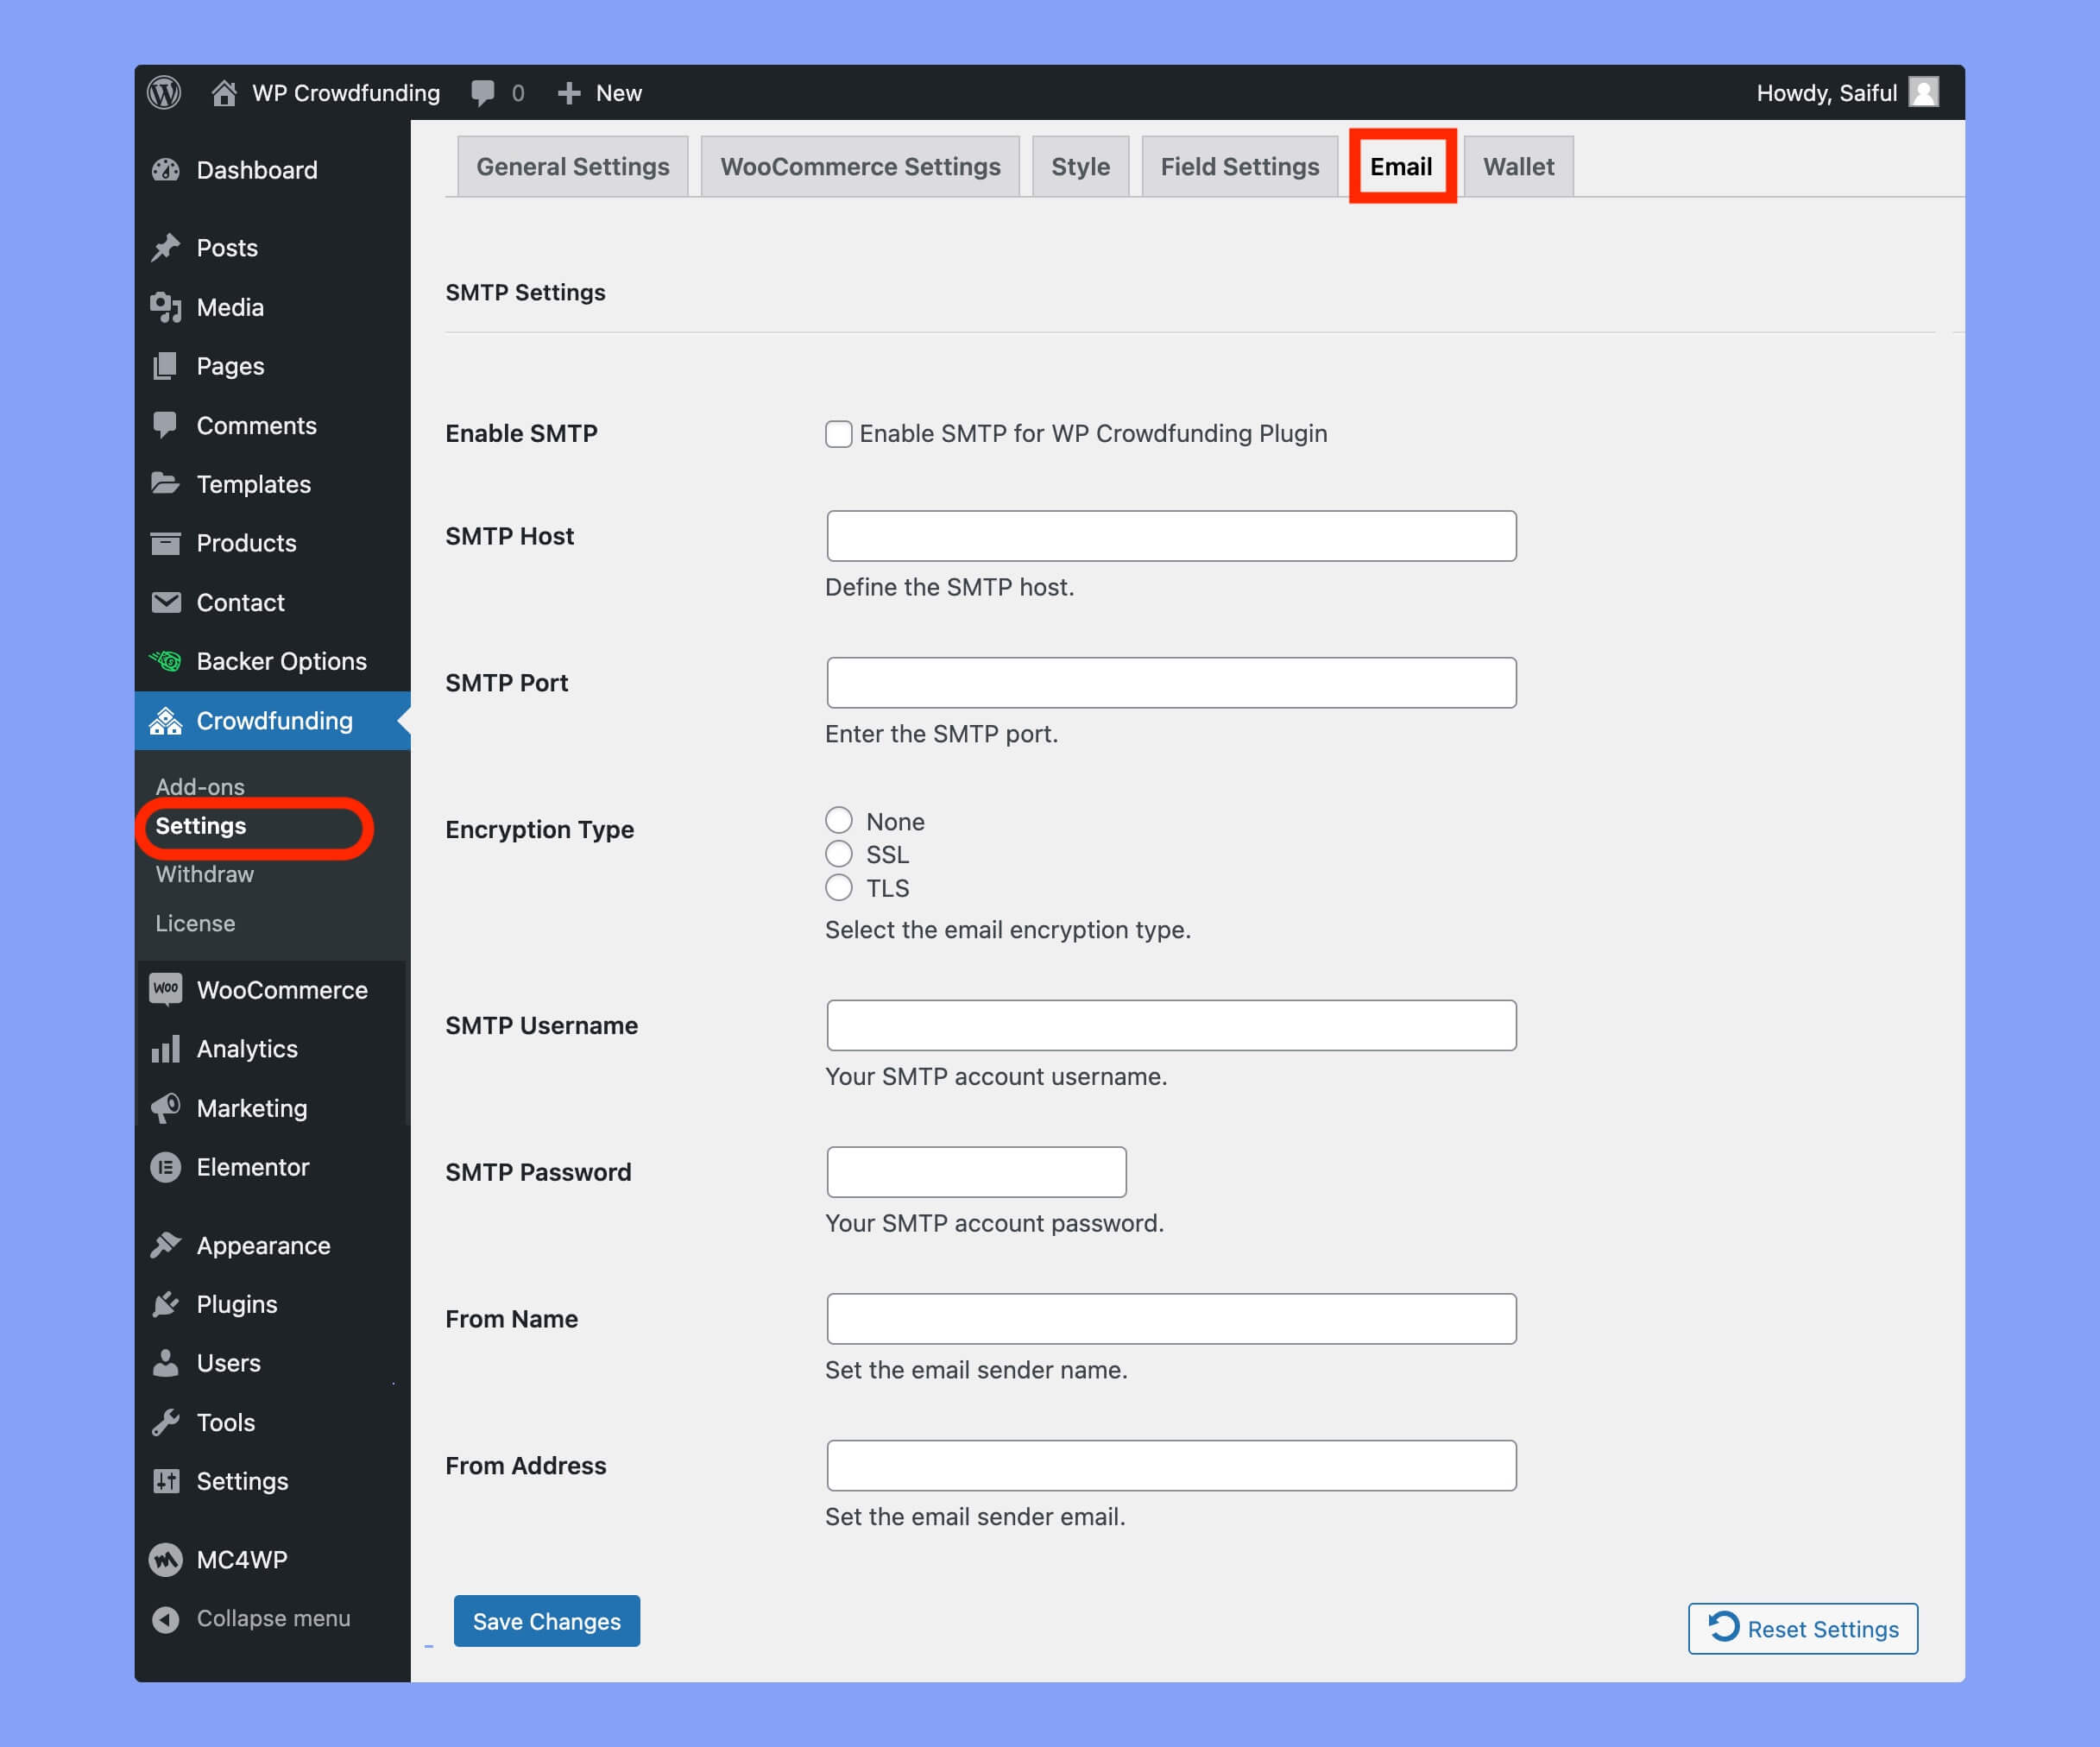
To receive Emails for the crowdfunding campaigns, you have to setup the SMTP from here.
To know more about setting up the emails, please check the Email addon documentation.
reCAPTCHA
Google reCAPTCHA uses an advanced risk analysis engine to protect your website from potential fraud. You can utilize the WP Crowdfunding reCAPTCHA tab to integrate Google reCAPTCHA on your crowdfunding website.
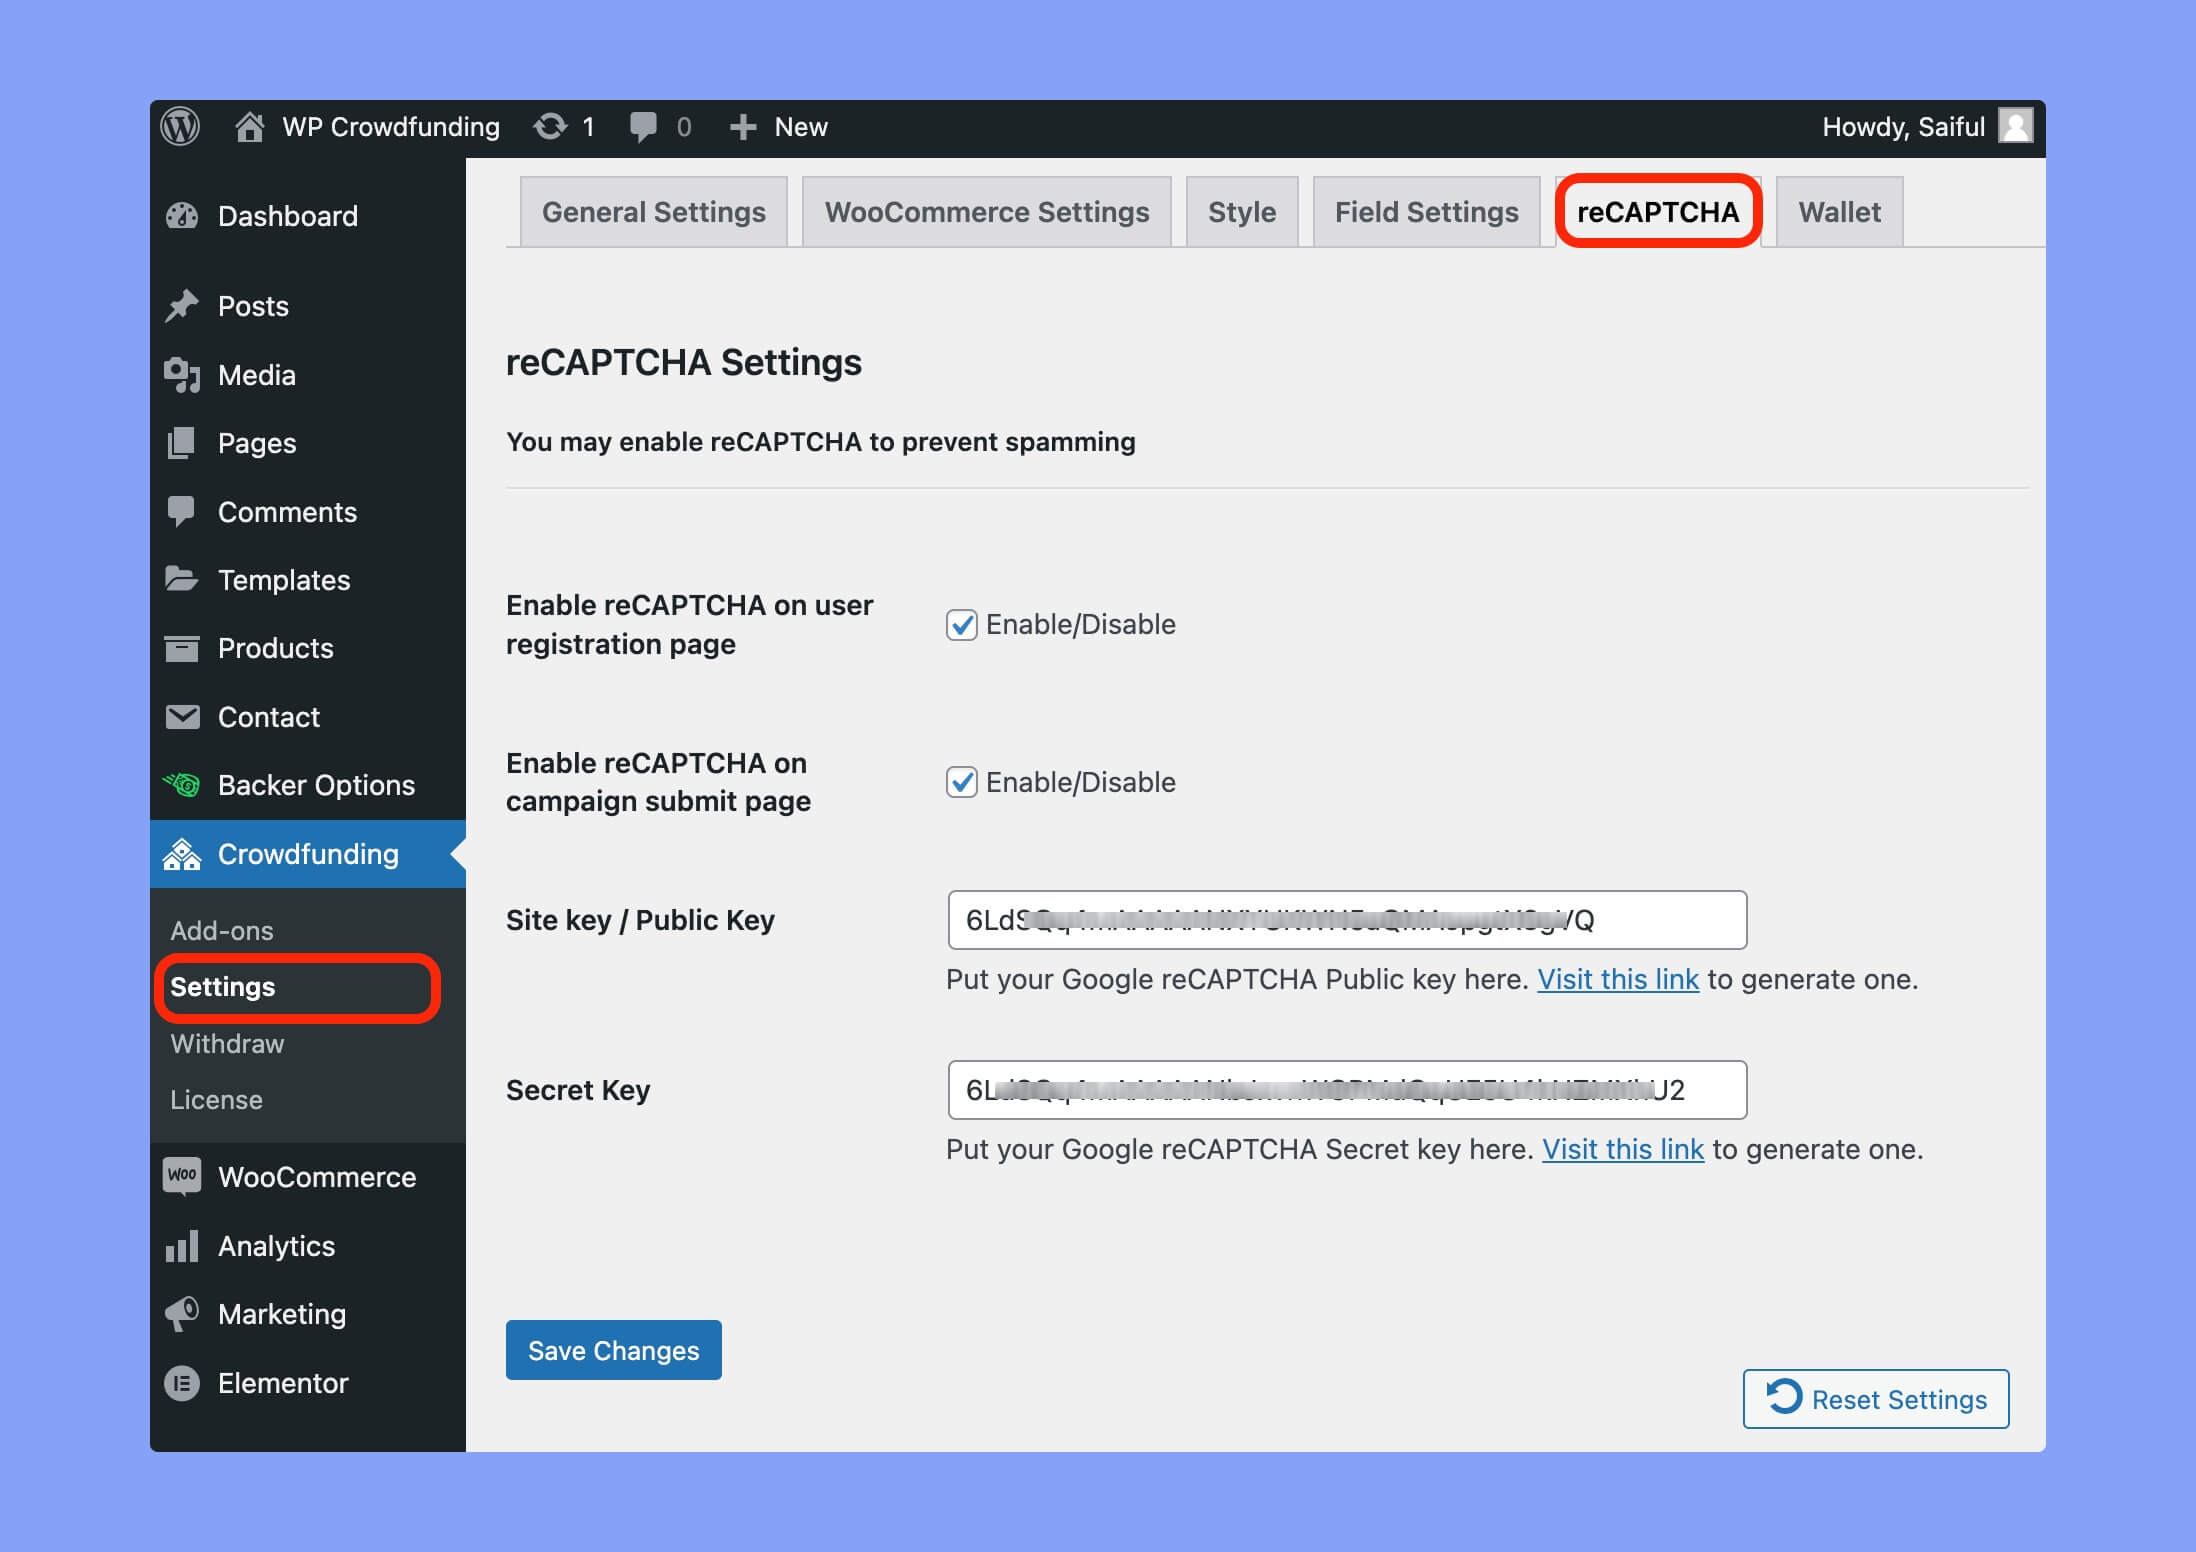
As you can see, you have to input the following information here –
- Enable reCAPTCHA on user registration page: Enable this option to put the reCAPTCHA checkbox on the user registration page.
- Enable reCAPTCHA on campaign submit page: Enable this option to put the reCAPTCHA checkbox on the campaign creation page.
- Site key / Public Key: Enter Google reCAPTCHA site key.
- Secret Key: Enter Google reCAPTCHA secret key.
To know more about reCAPTCHA settings, please check our dedicated reCAPTCHA documentation.
Wallet
The “Wallet” addon in WP Crowdfunding lets the users to deposit money in advance. It means they can add funds to their wallet and save them for future donations. It provides users with the flexibility to plan their donations and easily support campaigns whenever they wish.

To know more about this feature, please check our dedicated Wallet documentation.